RSS

Blog posts of '2025' 'December'

Kujou Sara Guide: The Definitive Build & Analysis

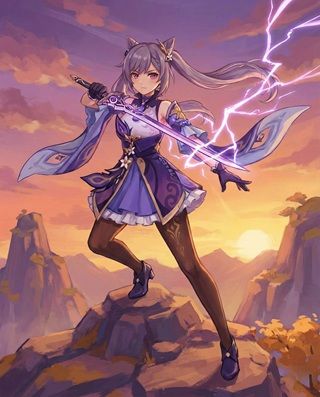
Kujou Sara, the Crowfeather Kaburaya

Kujou Sara Genshin Impact Character Art
Rarity (4-Star)
Element Electro
Weapon Bow
Best Role ATK Buffer / Nuke Support
Stat Priority High Base ATK > ER > CRIT
Tier A (S with C6)

Kujou Sara is the General of the Tenryou Commission and a fiercely loyal subject of the Raiden Shogun. She serves as a specialized Attack Buffer similar to Bennett, but with a unique niche: at C6, she provides a massive 60% CRIT DMG boost to Electro damage, making her the ultimate support for Raiden Shogun, Yae Miko, and Keqing.


Pros

  • Electro Queen: C6 provides 60% Electro CRIT DMG (irreplaceable).
  • Targeted Buff: Buffs ATK based on her Base ATK (Weapon + Level).
  • Burst DMG: Her Burst has surprisingly high scaling and buffs the active character.
  • Can apply buffs seamlessly in quick-swap teams.
  • Restores Energy to the team (A4 Passive).

Cons

  • Clunky at C0: Requires Aimed Shot to trigger buff (C2 fixes this).
  • Short Duration: Buff lasts only 6s (requires tight rotations).
  • High Cost: 80 Energy Burst requires massive ER investment.
  • Buff does not snap-shot for dynamic characters like Xiangling.

Quick Guide (TL;DR)

Sara is best played as a burst support who swaps in, buffs, drops her nuke, and leaves.

  • Best Artifact: 4pc Noblesse Oblige (Team Buff) or 4pc Emblem of Severed Fate (Personal DMG).
  • Best Weapon (5-Star): Skyward Harp or Elegy for the End (High Base ATK is priority).
  • Best Weapon (4-Star): Mouun's Moon (High Base ATK) or Sacrificial Bow (High Base ATK).
  • F2P Weapon: Fading Twilight or Blackcliff Warbow (For Base ATK).
  • Main Stats: SANDS: ER% | GOBLET: Electro DMG | CIRCLET: CRIT.
  • Talent Priority: Elemental Skill > Elemental Burst > Normal Attack.
  • Top Team: Raiden Shogun + Kujou Sara (C6) + Kazuha + Bennett (Raiden Hypercarry).
Pro Tip: Base ATK Only: Like Bennett, Sara's ATK buff scales ONLY off her Base ATK (Character Level + Weapon Base ATK). Artifact ATK% stats DO NOT increase her buff. Level her to 90 and give her the highest Base ATK bow you own.

Building Raiden Hypercarry?

Get Genesis Crystals to pull for Raiden or Sara cons securely.

Top Up Secure & Fast via GameCharge

Ascension & Talent Materials

Category Material Name Source
Ascension Dendrobium Inazuma (Nazuchi Beach / Kannazuka)
Boss Drop Storm Beads Thunder Manifestation (Seirai Island)
Talent Books Teachings of Elegance Violet Court (Tue/Fri/Sun)
Common Mob Damaged Mask Hilichurls
Weekly Boss Ashen Heart La Signora (Trounce Domain)

Talent Breakdown & Mechanics

Elemental Skill: Tengu Stormcall

  • Mechanic: Sara retreats rapidly. Her next Aimed Shot will leave a Crowfeather at the target location.
  • The Buff: The Crowfeather explodes after a short delay (Ambush), dealing AoE Electro DMG and granting an ATK Bonus to characters within its range.
  • At C2: Using the skill leaves a weaker Crowfeather at her original position automatically, removing the need to Aim Shot for the buff (HUGE QoL).

Elemental Burst: Subjugation: Koukou Sendou

  • The Strike: Calls down a Titanbreaker lightning strike, followed by 4 spreading Stormclusters.
  • Buff Refresh: The Titanbreaker and Stormclusters ALSO provide the same ATK Bonus as her Elemental Skill to the active character hit by them.
  • Energy Cost: 80 Energy. Requires high ER.

A4 Passive: Decorum

  • Energy Restore: When Crowfeather Ambush hits opponents, Sara restores 1.2 Energy to all party members for every 100% ER she has. This is why building ER on Sara is doubly effective.

Talent Priority Order:

  1. Elemental Skill (Level 9+) - Increases the ATK Buff ratio.
  2. Elemental Burst (Level 9+) - High damage potential. Buff ratio is tied to Skill level, but Burst damage is worth leveling.
  3. Normal Attack (Level 1) - Irrelevant.

Stat Requirements & ER Thresholds

Sara needs to burst off-cooldown to maintain buffs and deal damage. Because she is often the sole Electro alongside Raiden, her ER needs are high.

Team Context Artifact Set ER Requirement
With Raiden Shogun Noblesse / Emblem 160% - 180%
Solo Electro (Rare) Any 220% +
With Keqing/Fischl Any 180% - 200%

Substat Priority:

  1. Energy Recharge (Until requirement met)
  2. CRIT Rate / CRIT DMG (For personal Burst DMG)
  3. ATK% (For personal DMG, DOES NOT affect Buff)
  4. Base ATK (Weapon/Level - Affects Buff)

Best Artifacts Comparison

Set Name Role Reasoning
4pc Noblesse Oblige Best Support Grants 20% Team ATK on Burst. Stacks with her personal buff. Since Bennett usually runs Noblesse, check if he is on the team. If Bennett has NO, run Emblem on Sara.
4pc Emblem of Severed Fate Sub-DPS Sara needs tons of ER. This set converts ER to Burst DMG. At C6, her Burst hits extremely hard, making this optimal for personal damage.
4pc Tenacity of the Millelith Niche Only viable if you use her Skill precisely to trigger the ATK buff. Generally less consistent than Noblesse.

Weapon Rankings

Weapon Base ATK (Lv 90) Performance Notes
Skyward Harp 674 S+ Highest Base ATK (tied with Thundering Pulse). Best buff potential and great Crit stats.
Elegy for the End 608 S High Base ATK + ER Substat + Team Buff Passive. Incredible utility support weapon.
Mouun's Moon 565 A+ (4-Star) Highest Base ATK for a 4-star. Increases Burst DMG significantly.
Sacrificial Bow 565 A (High Base) High base ATK and ER. Passive is rarely needed at C2 but stats are perfect.
Fading Twilight 565 A (Event F2P) High Base ATK + ER. Excellent F2P option if you have it.

Constellation Value

Sara is functional at C0 but clunky. C2 is a massive QoL fix, and C6 turns her into a god-tier Electro support.

  • C2: Dark Wings - (QoL) Unleashing Tengu Stormcall leaves a weaker Crowfeather at Sara's original position. Removes the need to use Charged Attacks to apply the buff. Essential for smooth rotations.
  • C6: Sin of Pride - (The Electro Grail) The ATK Bonus provided by Sara grants characters 60% CRIT DMG for their Electro DMG. This is the single biggest Electro buff in the game.

Top Team Compositions

1. Raiden Hypercarry

  • Main DPS: Raiden Shogun
  • Buffer 1: Kujou Sara (C6)
  • Buffer 2: Bennett (Noblesse)
  • Anemo: Kazuha (VV Shred)

Why it works: The "Hyper" team. Bennett buffs ATK. Kazuha shreds RES and buffs Elemental DMG. Sara buffs ATK (stacking with Bennett) and gives 60% Crit DMG. Raiden hits for millions.

2. Keqing/Yae Aggravate

  • Main DPS: Keqing / Yae Miko
  • Support: Kujou Sara
  • Dendro: Nahida / Baizhu
  • Anemo: Kazuha

Why it works: While Dendro is the focus, Sara's C6 Crit DMG buff applies to Aggravate procs (since Aggravate is flat Electro DMG). This creates massive damage spikes for Keqing or Yae.

Rotations & Combos

Standard C2 Buff Rotation:
Supports Setup > Sara E (Don't move) > Sara Q > Swap to Raiden/Keqing immediately

Tip: The buff applies to the character who is active when the feather explodes or the lightning strikes. Swap fast!

Frequently Asked Questions

Is C6 Sara better than Bennett?
For Electro characters: Yes (damage ceiling is higher due to Crit DMG).
For everyone else: No. Bennett heals and his buff is easier to use. However, they are best used together in Hypercarry teams.

Why not use ATK% Sands?
Sara's buff scales off Base ATK only. Artifact ATK% does not increase the buff she gives to teammates. ER Sands allows her to Burst every rotation, which is far more valuable.

Data Source: KQM Standards. Last Updated: December 2025

Lisa Guide: The Definitive Build & Analysis

Lisa, The Librarian of Favonius

Lisa Genshin Impact Character Art
Rarity (4-Star)
Element Electro
Weapon Catalyst
Best Role DEF Shred Support / Aggravate DPS
Stat Priority ER > EM > CRIT (Support: ER Focus)
Tier A (Aggravate) / B (General)

Lisa is the intellectual Librarian of the Knights of Favonius and a brilliant graduate of the Sumeru Akademiya. While often overlooked, her kit possesses one of the rarest debuffs in the game: 15% DEF Shred. With the introduction of Dendro, her high Elemental Mastery scaling has also made her a formidable on-field DPS in Aggravate teams.


Pros

  • Rare Utility: Burst shreds enemy DEF by 15% (A4 Passive).
  • Aggravate Powerhouse: Ascends with Elemental Mastery, making her hit hard in Dendro teams.
  • Best F2P Support Weapon: Perfect carrier for "Thrilling Tales of Dragon Slayers" (TTDS).
  • High scaling on her Elemental Skill (Hold).
  • Completely Free-to-Play character.

Cons

  • Vulnerable: Holding Skill takes time and leaves her open to interruption (Needs a shield).
  • Energy Issues: High Burst cost (80) and creates particles only on Hold E.
  • Burst knocks small enemies away, making grouping annoying.
  • Constellations are hard to get (Standard Banner/Shop only).

Quick Guide (TL;DR)

Lisa generally has two distinct playstyles: Burst Support or On-Field DPS.

  • Best Artifact (Support): 4pc Noblesse Oblige or 4pc Emblem of Severed Fate.
  • Best Artifact (DPS): 4pc Thundering Fury or 4pc Gilded Dreams.
  • Best Weapon (Support): Thrilling Tales of Dragon Slayers (3-Star).
  • Best Weapon (DPS): Kagura's Verity (Signature) or The Widsith.
  • F2P Weapon (DPS): Mappa Mare or Hakushin Ring.
  • Main Stats: SANDS: ER% or EM | GOBLET: Electro DMG | CIRCLET: CRIT.
  • Talent Priority: Elemental Burst > Elemental Skill > Normal Attack.
  • Top Team: Lisa + Eula + Raiden + Bennett (Nuke Support).
Pro Tip: Conductive Stacks: Lisa's hold skill does massive damage based on how many "Conductive" stacks (numbers 1-3) are on the enemy. You apply stacks by Tapping E, Charged Attacks, or triggering Overload/Superconduct (A1 Passive). At C6, swapping Lisa in instantly applies 3 stacks to nearby enemies.

Need Lisa's "A Sobriquet Under Shade" Skin?

Get Genesis Crystals at a discounted price with instant delivery.

Top Up Secure & Fast via GameCharge

Ascension & Talent Materials

Category Material Name Source
Ascension Valberry Mondstadt (Stormbearer Mountains)
Boss Drop Lightning Prism Electro Hypostasis (Mondstadt)
Talent Books Teachings of Ballad Forsaken Rift (Wed/Sat/Sun)
Common Mob Slime Condensate Slimes (Everywhere)
Weekly Boss Dvalin's Claw Stormterror (Trounce Domain)

Talent Breakdown & Mechanics

Elemental Skill: Violet Arc

  • Tap: Sends out a homing lightning orb. On hit, it applies a "Conductive" stack (Max 3) to enemies in a small area.
  • Hold: After a long cast time, Lisa calls down lightning to deal massive AoE Electro DMG. The damage is multiplied significantly based on the number of Conductive stacks on the enemy.
  • Particle Generation: Tapping generates no particles. Holding generates 5 particles on hit.

Elemental Burst: Lightning Rose

  • The Lantern: Summons a Lightning Rose that unleashes powerful lightning bolts, launching nearby enemies and dealing Electro DMG.
  • DEF Shred (A4 Passive): Opponents hit by Lightning Rose have their Defense decreased by 15% for 10s. This is her primary support utility.
  • Application: Applies Electro rapidly, making it great for Dendro reactions.

A1 Passive: Induced Aftershock

  • Charged Attacks: Hitting enemies with a Charged Attack applies a Conductive stack. This is crucial for her on-field DPS combo.

Talent Priority Order:

  1. Elemental Burst (Level 8+) - For Support/Off-field DMG.
  2. Elemental Skill (Level 8+) - For Nuke DMG.
  3. Normal Attack (Level 1) - Level only if playing Main DPS.

Stat Requirements & ER Thresholds

Lisa has an 80 Cost burst and generates zero particles unless she completes a Hold E (which is risky). ER is her most important stat.

Team Context Role ER Requirement
Solo Electro Support DEF Shred (Eula Team) 200% - 240%
Double Electro Aggravate DPS 140% - 160%
With Raiden Shogun Sub-DPS 130% - 150%

Substat Priority:

  1. Energy Recharge (Until you can burst off-cooldown)
  2. Elemental Mastery (Aggravate scaling)
  3. CRIT Rate / CRIT DMG
  4. ATK%

Best Artifacts Comparison

Set Name Role Reasoning
4pc Emblem of Severed Fate BiS Support Since Lisa needs massive ER, Emblem converts that into significant Burst damage. Best for general use.
4pc Noblesse Oblige Pure Buffer Combined with TTDS and her DEF Shred, this makes her the ultimate "Nuke Showcase" support for characters like Eula or Raiden.
4pc Thundering Fury Aggravate DPS Reduces Skill cooldown, allowing more frequent Hold E nukes and better energy generation in Dendro teams.

Weapon Rankings

Weapon Type Performance Notes
Kagura's Verity CRIT DMG S+ (DPS) Yae Miko's signature is actually best-in-slot for DPS Lisa because it buffs Elemental Skill damage massively.
Thrilling Tales (TTDS) HP% S+ (Support) The 3-star king. At R5, it gives 48% ATK to the next character. Combined with DEF shred, this is her best support tool.
The Widsith CRIT DMG S (R5) Gacha 4-star. Huge burst potential if you roll the Elemental DMG or EM buff.
Favonius Codex ER% A (Support) Provides much needed particles for herself and the team. Great for comfort.

Constellation Value

Lisa's constellations are powerful but very difficult to obtain (Standard Banner or Paimon's Bargains only).

  • C1: Infinite Circuit - (Energy) Holding E regenerates 2 Energy per enemy hit (Max 10). Helps significantly with her ER issues.
  • C4: Plasma Eruption - (More Lightning) Increases the number of lightning bolts released by her Burst. Great for Dendro application.
  • C6: Pulsating Witch - (The Nuke) When Lisa takes the field, she instantly applies 3 Conductive stacks to nearby enemies. This allows you to Hold E immediately without setup for massive damage.

Top Team Compositions

1. Eula Nuke Support

  • Main DPS: Eula
  • Support: Lisa (TTDS + Noblesse)
  • Battery: Raiden Shogun / Rosaria
  • Sustain: Zhongli / Diona

Why it works: Lisa provides Electro for Superconduct, 15% DEF Shred (Burst), and 48% ATK (TTDS). This trio of buffs maximizes Eula's Lightfall Sword damage.

2. Aggravate DPS

  • Main DPS: Lisa (On-Field)
  • Sub-DPS: Fischl / Yae Miko
  • Dendro: Nahida / Baizhu / Kirara
  • Anemo: Kazuha / Sucrose

Why it works: Lisa has high EM scaling and innate Elemental Mastery ascension. Her constant Electro application drives Aggravate, and she can utilize the 4pc Thundering Fury set to reduce her Hold E cooldown.

Rotations & Combos

Standard DPS Combo (C0):
Tap E > Normal Attack > Tap E > Charged Attack > Hold E (3 Stacks) > Q

Support Rotation:
Lisa Q > Swap to Main DPS (Trigger TTDS)

Frequently Asked Questions

Is Lisa better than Raiden Shogun for Eula?
For pure "Damage per Screenshot" (big numbers), Yes. Lisa provides DEF shred and TTDS buffs which Raiden cannot. However, Raiden provides smoother rotations and energy regeneration.

How do I stop getting interrupted during Hold E?
Lisa has very low resistance to interruption. You almost always need a shielder (Zhongli/Kirara) or Xingqiu's rain swords to prevent being knocked out of her skill animation.

Data Source: KQM Standards. Last Updated: December 2025

Razor Guide: The Definitive Build & Analysis

Razor, the Legend of Wolvendom

Razor Genshin Impact Character Art
Rarity (4-Star)
Element Electro
Weapon Claymore
Best Role Physical Main DPS
Stat Priority CRIT > ATK% > Phys DMG
Tier B (Solid Early Game)

Razor is a boy raised by wolves in Wolvendom. He is the quintessential Selfish Carry, demanding high field time to unleash his inner wolf. While primarily a Physical DPS using Superconduct, the Dendro element has unlocked a chaotic "Rainbow Razor" build (Burgeon/Hyperbloom) that makes him surprisingly viable in the endgame.


Pros

  • Very easy to play (Unga Bunga playstyle).
  • High Physical DMG scaling and Attack Speed buff.
  • Excellent mining utility (Hold E breaks ores instantly).
  • "Rainbow Razor" (C6 Bennett + Dendro) is a fun, viable meta twist.
  • Inherently tanky due to high defense and interruption resistance.

Cons

  • Selfish Burst: Switching characters ends his Burst immediately.
  • Physical DMG falls off in late-game Spiral Abyss content.
  • Energy hungry if you don't manage his Sigils correctly.
  • Knocks small enemies away, requiring chasing.

Quick Guide (TL;DR)

Razor wants to stay on field and hit things with his claymore. Period.

  • Best Artifact: 4pc Pale Flame (Best for Physical).
  • Alt Artifact: 4pc Gladiator's Finale (Easier to farm/Strongbox).
  • Best Weapon: Wolf's Gravestone or Song of Broken Pines.
  • Best 4-Star Weapon: Serpent Spine (Battle Pass).
  • F2P Weapon: Prototype Archaic (Craftable) or Snow-Tombed Starsilver.
  • Main Stats: SANDS: ATK% | GOBLET: Physical DMG | CIRCLET: CRIT.
  • Talent Priority: Normal Attack > Elemental Burst > Elemental Skill.
  • Top Team: Razor + Rosaria + Mika/Zhongli + Fischl (Superconduct).
Pro Tip: Sigil Management: Razor's Tap E generates Electro Sigils (max 3) that increase ER. Holding E consumes them to generate massive Energy. The loop is usually: Tap E > Tap E > Tap E > Hold E to bank energy > Burst.

Need Genesis Crystals?

Get Genesis Crystals at a discounted price with instant delivery.

Top Up Secure & Fast via GameCharge

Ascension & Talent Materials

Category Material Name Source
Ascension Wolfhook Mondstadt (Wolvendom)
Boss Drop Lightning Prism Electro Hypostasis (Mondstadt)
Talent Books Teachings of Resistance Forsaken Rift (Tue/Fri/Sun)
Common Mob Damaged Mask Hilichurls
Weekly Boss Dvalin's Claw Stormterror (Trounce Domain)

Talent Breakdown & Mechanics

Normal Attack: Steel Fang

  • The Bread & Butter: Razor's main damage comes from his 4-hit Normal Attack sequence.
  • Physical DMG: Razor naturally gains Physical DMG bonus upon ascension, enhancing these strikes.
  • Scaling: Has some of the highest multipliers for claymore users.

Elemental Skill: Claw and Thunder

  • Press: Quick Electro slash. Generates an Electro Sigil (Max 3). Each Sigil increases his ER.
  • Hold: Unleashes an AoE lightning storm. Consumes all Sigils to convert them into flat Energy (5 Energy per Sigil).
  • Mining: Holding E instantly breaks all mineral ores in range. Top tier for farming.

Elemental Burst: Lightning Fang

  • The Wolf Within: Summons the Wolf Within to fight alongside Razor.
  • Buffs: Increases ATK SPD, Electro RES, and interruption resistance.
  • Soul Companion: The Wolf strikes every time Razor strikes, dealing Electro DMG. This creates a hybrid mix of Physical (Razor) and Electro (Wolf) damage.
  • Constraint: The effect ends immediately if Razor leaves the field.

Talent Priority Order:

  1. Normal Attack (Level 10) - Primary damage source.
  2. Elemental Burst (Level 8+) - Attack speed and companion damage.
  3. Elemental Skill (Level 6+) - For particle generation.

Stat Requirements & ER Thresholds

Razor relies on his burst for the ATK SPD buff. While he generates sigils, he still needs decent ER to burst off-cooldown.

Team Context With Battery (Fischl)? ER Requirement
Standard No 140% - 150%
Double Electro Yes (Fischl/Raiden) 120% - 130%

Substat Priority:

  1. CRIT Rate / CRIT DMG (Standard 1:2 Ratio)
  2. ATK% (Base scaling)
  3. Energy Recharge (Until burst is comfortable)
  4. Elemental Mastery (Only for Rainbow/Hyperbloom Razor)

Best Artifacts Comparison

Set Name Role Reasoning
4pc Pale Flame BiS Physical Razor's short Skill CD allows him to maintain the 4pc stack easily (ATK% and 50% Phys DMG). Best in slot for traditional builds.
4pc Gladiator's Finale Generalist Increases Normal Attack DMG by 35%. Very consistent and easy to obtain via Strongbox/Bosses.
4pc Gilded Dreams Rainbow Razor Used specifically for the "Rainbow" build (Razor + C6 Bennett + Dendro + Hydro). Maximizes reaction damage (Burgeon/Overload).

Weapon Rankings

Weapon Type Performance Notes
Song of Broken Pines Phys DMG S+ Eula's signature, but great on Razor. High Base ATK and ATK Speed buffs make him hit extremely fast.
Wolf's Gravestone ATK% S Canonically his sword. Massive ATK boost. Very strong but hard to balance Crit ratio.
Serpent Spine CRIT Rate S (R5) Battle Pass. Since Razor is on-field, he takes more hits, so a shielder (Zhongli) is recommended to keep the stacks.
Prototype Archaic ATK% A (F2P) Standard craftable. The passive deals extra physical damage periodically. Solid starter choice.

Constellation Value

Razor is perfectly playable at C0, but C4 is his most important utility constellation.

  • C1: Wolf's Instinct - (DMG Buff) Picking up an Elemental Orb/Particle increases DMG by 10% for 8s. Good consistent buff.
  • C4: Bite - (DEF Shred) Pressing Claw and Thunder (Skill) decreases opponent DEF by 15% for 7s. This is huge because DEF Shred is a rare multiplier.
  • C6: Lupus Fulguris - (Extra Electro) Every 10s, Razor's sword charges up, causing the next Normal Attack to deal 100% ATK as Electro DMG. Helps apply Electro for Superconduct.

Top Team Compositions

1. Traditional Superconduct

  • Main DPS: Razor
  • Cryo: Rosaria / Kaeya / Qiqi
  • Sub-DPS/Utility: Fischl / Yun Jin
  • Sustain: Zhongli / Diona / Mika

Why it works: Electro + Cryo creates Superconduct, reducing enemy Physical RES by 40%. Rosaria gives Crit Rate (C2 shreds Phys RES at C6). Yun Jin buffs Normal Attacks. Mika provides ATK Speed and Phys Healing.

2. Rainbow Razor (C6 Bennett Required)

  • Driver: Razor (Full EM)
  • Dendro: Nahida / Dendro MC
  • Hydro: Xingqiu / Yelan
  • Pyro: Bennett (C6)

Why it works: Also known as "Thundering Furry." C6 Bennett infuses Razor with Pyro. Razor's Burst adds Electro. Xingqiu adds Hydro. Nahida adds Dendro. Razor triggers Overload (Pyro+Electro), Electro-Charged (Electro+Hydro), Vaporize, and Burgeon ALL AT ONCE. It's chaotic and incredibly strong.

Rotations & Combos

Standard Physical Rotation:
Supports (Rosaria Q, Zhongli E) > Razor Tap E > Razor Q > Razor Tap E > N3D or N4...

Tip: Using Q resets the cooldown of E. Always E before Q to catch particles, then E again immediately after Q to trigger 4pc Pale Flame stacks instantly.

Frequently Asked Questions

Should I activate C6 Bennett with Razor?
If you play Physical Razor: NO. It ruins his damage by converting Physical attacks to Pyro (which he doesn't scale with).
If you play Rainbow Razor: YES. It is required for the Burgeon interactions.

N3D vs N4?
N3D means "Normal Attack x3 -> Dash cancel". Razor's 4th hit is very slow. Dashing after the 3rd hit increases DPS, but consumes stamina. If stamina is low, just do the full N4 chain.

Data Source: KQM Standards. Last Updated: December 2025

Beidou Guide: The Definitive Build & Analysis

Beidou, Uncrowned Lord of the Ocean

Beidou Genshin Impact Character Art
Rarity (4-Star)
Element Electro
Weapon Claymore
Best Role Off-Field DPS / Shielder
Stat Priority ER > CRIT > ATK%
Tier A (S in Multi-Target)

Beidou is the Captain of the Crux Fleet, a legendary figure in Liyue who slew the leviathan Haishan without a Vision. She is a powerhouse Off-Field DPS who excels in scenarios with 2 or more enemies. Her unique Counter mechanic provides high skill expression, while her Burst offers significant damage reduction and shield utility.


Pros

  • Highest scaling Off-Field DPS against 2 targets.
  • Provides Damage Reduction (30%+) and Interruption Resistance.
  • Unique "Perfect Counter" mechanic deals massive damage.
  • Synergizes perfectly with "Taser" (Electro-Charged) teams.
  • C1 provides a shield, consolidating defense.

Cons

  • Energy Hungry: Needs 160-180% ER without a battery (Fischl).
  • Performance drops significantly in single-target (Bosses).
  • Burst does not trigger on Raiden Shogun's attacks.
  • Perfect Counters require enemy aggression/timing.

Quick Guide (TL;DR)

Beidou is built to use her Burst off-cooldown to shred groups of enemies with chain lightning.

  • Best Artifact: 4pc Emblem of Severed Fate (Solves ER & buffs Burst).
  • Alt Artifact: 2pc Thundering Fury / 2pc Noblesse / 2pc ATK.
  • Best Weapon: Wolf's Gravestone or Serpent Spine (Battle Pass).
  • Best 4-Star Weapon: Akuoumaru or Luxurious Sea-Lord (Fish).
  • F2P Weapon: Prototype Archaic (Craftable) or Favonius Greatsword (Utility).
  • Main Stats: SANDS: ER% or ATK% | GOBLET: Electro DMG | CIRCLET: CRIT.
  • Talent Priority: Elemental Burst > Elemental Skill > Normal Attack (Ignore).
  • Top Team: Sucrose + Xingqiu + Beidou + Fischl (Classic Taser).
Pro Tip: The Perfect Counter: You don't always have to hold her Skill. Tap E exactly when an enemy attack hits you to trigger a Max Damage Counter immediately. This generates the most particles and damage instantly.

Need Genesis Crystals?

Get Genesis Crystals at a discounted price with instant delivery.

Top Up Secure & Fast via GameCharge

Ascension & Talent Materials

Category Material Name Source
Ascension Noctilucent Jade Liyue (Caves / Mingyun Village)
Boss Drop Lightning Prism Electro Hypostasis (Mondstadt)
Talent Books Teachings of Gold Taishan Mansion (Wed/Sat/Sun)
Common Mob Treasure Hoarder Insignias Treasure Hoarders
Weekly Boss Dvalin's Sigh Stormterror (Trounce Domain)

Talent Breakdown & Mechanics

Elemental Skill: Tidecaller

  • Press: Simple electro slash. Generates fewer particles.
  • Hold (Counter): Raises her claymore as a shield. Absorbs DMG based on Max HP. Upon release (or shield break), she slashes.
  • Damage Bonus: DMG increases if she is hit 1 or 2 times during the hold.
  • Perfect Counter (A1 Passive): If you use Tidecaller at the exact moment you are hit, you instantly deal Max Damage (as if hit twice). This is her signature mechanic.

Elemental Burst: Stormbreaker

  • Mechanic: Creates a Thunderbeast's Targe around the character. Normal and Charged attacks trigger chain lightning (1s cooldown).
  • Chain Lightning: The lightning jumps between enemies. At C2, it can jump to up to 4 targets total per proc.
  • Defensive Utility: Provides ~30%+ Damage Reduction (stacks with Xingqiu) and resistance to interruption.
  • Snapshot: The damage snapshots stats on cast. Stand in Bennett's circle before casting!

Talent Priority Order:

  1. Elemental Burst (Level 10) - The majority of her damage.
  2. Elemental Skill (Level 8+) - High burst damage on counters.
  3. Normal Attack (Level 1) - Ignore unless playing Main DPS Beidou (rare).

Stat Requirements & ER Thresholds

Beidou's 80 Energy Cost is her biggest weakness. Perfect Counters generate more energy (4 particles) than simple taps (2 particles).

Team Context With Fischl? ER Requirement
Solo Electro No 180% - 220% (Very High)
Double Electro Yes (Fischl) 130% - 150% (Manageable)
Triple Electro Yes 110% - 130%

Substat Priority:

  1. Energy Recharge (Until requirement met)
  2. CRIT Rate / CRIT DMG (Standard 1:2 Ratio)
  3. ATK% (Scales all damage)
  4. Elemental Mastery (Useful only in Taser/Aggravate)

Best Artifacts Comparison

Set Name Role Reasoning
4pc Emblem of Severed Fate BiS General Solves her ER issues and converts that ER into massive Burst DMG. Perfect synergy.
4pc Noblesse Oblige Support Use this if no one else in the team has it. Sacrifices personal damage for team ATK buff.
2pc TF / 2pc Noblesse Mixed Classic DPS build. Good if you already have high ER substats and don't need Emblem's passive.

Weapon Rankings

Weapon Type Performance Notes
Serpent Spine CRIT Rate S+ (R5) Battle Pass weapon. At R5, it rivals or beats 5-stars due to the DMG% passive, since Beidou is off-field and doesn't lose stacks.
Wolf's Gravestone ATK% S Massive ATK stat stick. Passive buffs the whole team against low HP enemies.
Akuoumaru ATK% A+ Gacha 4-star. Passive boosts Burst DMG based on team's energy capacity. Great for high cost teams (Raiden/Beidou).
Prototype Archaic ATK% B (F2P) Standard craftable. Decent performance if you have nothing else. Favonius Greatsword is often better for smooth rotations.

Constellation Value

Beidou's C2 is one of the most powerful constellations in the game for AoE scenarios.

  • C1: Sea Beast's Scourge - (Shield) Creates a shield (16% HP) when using Stormbreaker. Adds defensive comfort and interrupt resistance.
  • C2: Upon the Turbulent Sea - (Massive DMG) The chain lightning jumps to 2 additional targets. This is a ~40-60% damage increase in multi-target fights. Mandatory for optimization.
  • C6: Bane of the Evil - (RES Shred) During Burst, decreases Electro RES of surrounding enemies by 15%. Great for boosting her own and Fischl's damage.

Top Team Compositions

1. Classic Taser

  • Driver: Sucrose / Heizou / Ayato
  • Sub-DPS 1: Beidou
  • Sub-DPS 2: Fischl (Essential Battery)
  • Hydro: Xingqiu / Yelan

Why it works: Electro-Charged allows both Electro and Hydro auras to coexist. Sucrose swirls both for massive reaction damage. Beidou + Xingqiu creates an impenetrable shield of damage reduction (~80%).

2. Eula Physical

  • Main DPS: Eula
  • Sub-DPS: Beidou
  • Battery: Raiden Shogun / Fischl
  • Sustain: Diona / Zhongli

Why it works: Beidou applies off-field Electro for Superconduct (Phys Shred) without messing up Cryo resonance too much. She adds AoE damage which Eula sometimes lacks outside of her nuke.

Rotations & Combos

The Taser Rotation:
Fischl E > Xingqiu Q E E > Beidou E Q > Sucrose N1 E N1 E Q...

Tip: Always try to catch particles with Beidou. If you switch off her too fast after using E, she won't get the energy particles, increasing her ER needs. Use E, wait a split second to see the orbs fly into her, then swap.

Frequently Asked Questions

Does Raiden Shogun work with Beidou?
NO. This is a famous anti-synergy. Beidou's Burst requires "Normal Attack hit" to trigger. Raiden's Burst attacks count as "Elemental Burst DMG," so they do not trigger Beidou's lightning. Do not run them together unless you know exactly what you are doing.

Serpent Spine vs. Wolf's Gravestone?
In a vacuum, WGS gives more ATK. However, Serpent Spine allows easier crit balancing and the DMG% passive is extremely valuable. Serpent Spine R5 often beats WGS R1 in optimized teams (especially with Bennett buffing ATK).

Data Source: KQM Standards. Last Updated: December 2025

Kuki Shinobu Guide: The Definitive Build & Analysis

Kuki Shinobu, The Deputy & The Healer

Kuki Shinobu Genshin Impact Character Art
Rarity (4-Star)
Element Electro
Weapon Sword
Best Role Hyperbloom Trigger / Healer
Stat Priority EM > HP% > Healing Bonus
Tier S (In Hyperbloom)

Kuki Shinobu is the capable Deputy of the Arataki Gang. Initially considered an average healer, the introduction of Dendro catapulted her to top-tier status. Her ability to trigger Hyperbloom reactions from off-field with 100% uptime while consolidating the Healer role makes her one of the most valuable 4-star units in the game.


Pros

  • The best Hyperbloom trigger in the game (AoE ring hits seeds easily).
  • Consolidates Healing and Damage into one slot.
  • Extremely cheap to build (Full EM main stats, no Crit needed).
  • 100% Skill uptime (especially at C2).
  • Does not require Energy Recharge (Skill-based gameplay).

Cons

  • Sacrifices her own HP to heal others (lives in the "Red Zone").
  • Healing is lower on Full EM builds compared to HP builds.
  • Burst damage is negligible in reaction builds.
  • Skill requires close range to hit enemies/seeds.

Quick Guide (TL;DR)

Kuki is built to stack Elemental Mastery (EM) to maximize Hyperbloom damage while providing sufficient healing.

  • Best Artifact: 4pc Gilded Dreams or 4pc Flower of Paradise Lost.
  • Support Artifact: 4pc Tenacity of the Millelith (If playing pure healer/buffer).
  • Best Weapon: Freedom-Sworn (Team Buffs) or Key of Khaj-Nisut (HP->EM Conversion).
  • Best 4-Star Weapon: Iron Sting or Toukabou Shigure (Craftable/Event).
  • F2P Weapon: Iron Sting (Craftable).
  • Main Stats: SANDS: EM | GOBLET: EM | CIRCLET: EM (or Healing Bonus for comfort).
  • Talent Priority: Elemental Skill > Elemental Burst > Normal Attack (Ignore).
  • Top Team: Alhaitham + Xingqiu + Kuki Shinobu + Nahida (Quickbloom).
Pro Tip: The Suicide Healer: Kuki consumes 30% of her current HP to cast her skill. You want her HP to be below 50% to activate her C6 and A4 passive bonuses, but be careful not to swap her into a heavy hit. Let her ring heal the on-field character, not herself.

Need Genesis Crystals?

Get Genesis Crystals at a discounted price with instant delivery.

Top Up Secure & Fast via GameCharge

Ascension & Talent Materials

Category Material Name Source
Ascension Naku Weed Inazuma (Seirai Island / Tatarasuna)
Boss Drop Runic Fang Ruin Serpent (The Chasm)
Talent Books Teachings of Elegance Violet Court (Tue/Fri/Sun)
Common Mob Spectral Husk Specters (Inazuma/Sumeru)
Weekly Boss Tears of the Calamitous God Raiden Shogun (Trounce Domain)

Talent Breakdown & Mechanics

Elemental Skill: Sanctifying Ring

  • Mechanic: Creates a Grass Ring of Sanctification at the cost of 30% current HP.
  • Effect: The ring follows the active character, dealing Electro DMG to nearby enemies and Healing the active character every 1.5s.
  • Hyperbloom Trigger: This is the key. The Electro ring has an AoE that hits Dendro Cores on the ground perfectly, triggering Hyperbloom reliably from off-field.

Elemental Burst: Gyoei Narukami Kariyama Rite

  • Mechanic: Creates a field of Electro DMG based on Kuki's Max HP.
  • Low HP Bonus: If Kuki's HP is below 50% when cast, the field lasts longer.
  • Usage: Mostly used for i-frames or breaking Elemental shields. Damage is negligible in EM builds.

A4 Passive: Heart's Repose

  • Stat Conversion: Boosts Kuki's ability based on her Elemental Mastery (EM).
  • Healing: Healing amount is increased by 75% of EM.
  • Damage: Damage is increased by 25% of EM.
  • Synergy: This passive allows full EM builds (for Hyperbloom damage) to still heal a respectable amount.

Talent Priority Order:

  1. Elemental Skill (Level 9+) - For healing and reaction interval.
  2. Elemental Burst (Level 1-6) - Low priority.
  3. Normal Attack (Level 1) - Ignore completely.

Stat Requirements & ER Thresholds

Kuki relies mostly on her Skill, which produces particles but doesn't require Energy to function for her primary role.

Build Primary Stat ER Requirement
Hyperbloom (Recommended) Elemental Mastery 0% (Burst Optional)
Pure Healer HP% / Healing Bonus 0% (Burst Optional)

Substat Priority:

  1. Elemental Mastery (Target 900-1000+)
  2. HP% (For healing comfort)
  3. Flat HP
  4. Energy Recharge (Lowest priority)

Best Artifacts Comparison

Set Name Role Reasoning
4pc Gilded Dreams BiS Hyperbloom Provides massive EM (up to 230) which directly scales Hyperbloom damage. Easy to farm.
4pc Flower of Paradise Lost BiS Hyperbloom Mathematically slightly higher damage ceiling than Gilded for reaction damage, but less resin efficient to farm.
4pc Tenacity of the Millelith Support/Healer Use this for Aggravate or Physical teams where Kuki acts as a healer/buffer. Skill triggers the ATK buff perfectly.

Weapon Rankings

Weapon Type Performance Notes
Freedom-Sworn EM S+ High EM stat and team-wide buffing. Best for increasing team DPS.
Key of Khaj-Nisut HP% S Massive HP boost creates huge healing, and passive converts HP to EM for the team. Excellent hybrid option.
Iron Sting (R1-R5) EM S (F2P) Craftable. Provides EM. Passive is irrelevant for Hyperbloom but stats are perfect. R1 is enough.
Toukabou Shigure EM S (Event) Functionally identical to Iron Sting for Kuki. Use whichever looks better on her.

Constellation Value

Kuki works at C0, but C2 is a game-changer for rotation smoothness.

  • C2: To Forsake Fortune - (100% Uptime) Increases Skill duration by 3s. This makes the duration (15s) match the Cooldown (15s), allowing for zero downtime on healing and application.
  • C4: To Sever Sealing - (Extra App) Adds a coordinated Electro hit based on HP. Helps trigger Deepwood Memories or key reactions.
  • C6: To Ward Weakness - (Immortality) When Kuki takes lethal damage, she survives with 1 HP (60s CD). Also grants massive EM when HP is low. A "Get out of Jail Free" card.

Top Team Compositions

1. Hyperbloom (The Meta)

  • On-Field: Alhaitham / Nahida / Ayato
  • Hydro: Xingqiu / Yelan / Furina
  • Dendro: Nahida / DMC / Baizhu
  • Trigger: Kuki Shinobu

Why it works: Hydro + Dendro creates Bloom seeds. Kuki's Electro ring pulses, hitting the seeds and transforming them into homing Hyperbloom missiles. Kuki builds full EM to maximize this damage.

2. Aggravate/Spread Support

  • DPS: Tighnari / Alhaitham / Cyno
  • Sub-DPS: Fischl / Yae Miko
  • Healer: Kuki Shinobu
  • Flex: Kazuha / Zhongli

Why it works: Kuki provides role consolidation (Electro app + Healing) allowing you to run more offensive units like Fischl.

Rotations & Combos

The Simple Cycle:
Hydro/Dendro Setup > Kuki E > Main DPS On-Field > Repeat

Tip: If you have C4 Kuki, try to weave in a Normal Attack occasionally to trigger the extra Electro mark, though it's not strictly necessary for Hyperbloom.

Frequently Asked Questions

Why is Kuki's HP always low?
Her skill costs 30% current HP to cast. This is intentional. She performs better at low HP (A4 Passive, C6). Just ensure you have C6 or a shielder if you feel unsafe, or just let her ring heal her up occasionally.

Kuki vs. Raiden for Hyperbloom?
Raiden triggers seeds faster (0.9s vs 1.5s) and at longer range. However, Kuki heals, consolidating the survival slot. Kuki is generally preferred because she frees up the team slots for more offensive units like Nahida/Yelan.

Data Source: KQM Standards. Last Updated: December 2025

Fischl Guide: The Definitive Build & Analysis

Fischl, The Prinzessin & Oz

Fischl Genshin Impact Character Art
Rarity (4-Star)
Element Electro
Weapon Bow
Best Role Off-Field Sub-DPS
Stat Priority CRIT > ATK% > EM
Tier S (Aggravate Queen)

Fischl, the Prinzessin der Verurteilung, is one of the strongest 4-star characters in Genshin Impact. While she claims to hail from the Immernachtreich, her true power lies in summoning Oz, her raven familiar. With the introduction of Dendro, her A4 Passive (which has no ICD) makes her an absolute monster in Aggravate teams.


Pros

  • Insane single-target off-field damage.
  • The best Electro battery in the game (generates particles constantly).
  • A4 Passive abuses the Aggravate reaction (No ICD).
  • Easy to play (Summon Oz and swap).
  • Very F2P friendly (often given for free).

Cons

  • Strictly single-target damage (lacks AoE).
  • Oz is stationary (though easily repositioned).
  • Very squishy base stats.
  • Requires strict cooldown management to keep Oz uptime 100%.

Quick Guide (TL;DR)

Fischl is all about keeping Oz on the field 100% of the time by alternating Skill and Burst.

  • Best Artifact: 4pc Golden Troupe (70% Skill DMG is unbeatable).
  • Alt Artifact: 2pc TF / 2pc ATK or 4pc Thundering Fury (for Aggravate driving).
  • Best Weapon: Polar Star or Aqua Simulacra (5-Star).
  • Best 4-Star Weapon: The Stringless (R5 Stringless often beats R1 5-stars).
  • F2P Weapon: Prototype Crescent or Song of Stillness.
  • Main Stats: SANDS: ATK% or EM | GOBLET: Electro DMG | CIRCLET: CRIT.
  • Talent Priority: Elemental Skill > Elemental Burst (for damage) > Normal Attack (Ignore).
  • Top Team: Keqing + Fischl + Kazuha + Nahida (Aggravate).
Pro Tip: Oz Management: Use Skill (E) to summon Oz for 10s. When Oz disappears, use Burst (Q) to fly in and re-summon Oz for another 10s. This creates a near-infinite loop of Electro application.

Need Fischl's Skin?

Get Genesis Crystals at a discounted price with instant delivery.

Top Up Secure & Fast via GameCharge

Ascension & Talent Materials

Category Material Name Source
Ascension Small Lamp Grass Mondstadt (Wolvendom at Night)
Boss Drop Lightning Prism Electro Hypostasis
Talent Books Teachings of Ballad Forsaken Rift (Wed/Sat/Sun)
Common Mob Arrowheads Hilichurl Shooters
Weekly Boss Spirit Locket of Boreas Andrius (Wolf of the North)

Talent Breakdown & Mechanics

Elemental Skill: Nightrider

  • Mechanic: Summons Oz to the field. Oz shoots Electro projectiles at enemies continuously for 10s.
  • Snapshot: Oz snapshots Fischl's stats on cast. If you buff Fischl, cast E immediately.
  • Recast: Pressing E again while Oz is active will reposition him to Fischl's side.

Elemental Burst: Midnight Phantasmagoria

  • Mechanic: Fischl transforms into Oz, flying briefly and dealing Electro DMG to enemies she passes.
  • The Reset: The most important part of the Burst is that it resets Oz's duration. After the flight ends, Oz remains on the field for another 10s.
  • I-Frames: Provides decent invulnerability frames, but she is vulnerable during the flight.

A4 Passive: Undone Be Thy Sinful Hex

  • The Bread & Butter: If your active character triggers an Electro-related reaction while Oz is on the field, the enemy is struck with Thundering Retribution, dealing Electro DMG equal to 80% of Fischl's ATK.
  • No ICD: This damage has very low/no Internal Cooldown (ICD). In Aggravate teams, this passive triggers constantly, dealing massive reaction damage.

Talent Priority Order:

  1. Elemental Skill (Level 10) - Main source of damage.
  2. Elemental Burst (Level 8+) - Increases initial nuke damage.
  3. Normal Attack (Level 1) - Only level for Physical DPS (Niche).

Stat Requirements & ER Thresholds

Fischl is a battery herself, so her ER requirements are quite low, allowing you to focus purely on offensive stats.

Team Context Electro Resonance ER Requirement
Double Electro (Aggravate) Yes 100% - 115% (Base)
Solo Electro (Taser) No 120% - 130%

Substat Priority:

  1. CRIT Rate / CRIT DMG (Target 70/140+)
  2. ATK% (Scales Oz DMG and A4 Passive)
  3. Elemental Mastery (High priority for Aggravate teams)
  4. Energy Recharge (Low priority)

Best Artifacts Comparison

Set Name Role Reasoning
4pc Golden Troupe Best in Slot Provides +70% Elemental Skill DMG when off-field. Since 90% of Fischl's damage comes from Oz while she is off-field, this set is mathematically superior to everything else.
4pc Tenacity of the Millelith Support Oz triggers the 20% ATK buff consistently. Use this if you want to buff your Main DPS (e.g., Eula) at the cost of Fischl's personal damage.
2pc TF / 2pc ATK Transitional Good generalist build if you don't have a good Golden Troupe set yet.

Weapon Rankings

Weapon Type Performance Notes
Polar Star / Aqua Simulacra CRIT Rate/DMG S+ Massive stat sticks. Polar Star requires stack management (NA/CA/Skill/Burst), Aqua requires being somewhat close to enemies.
The Stringless (R5) EM S Best 4-star. Increases Skill/Burst DMG by 48%. The EM substat is incredible for Aggravate. Beats many R1 5-stars.
Alley Hunter ATK% S- Great off-field passive. Often stronger than Stringless in non-reaction teams.
Prototype Crescent ATK% A (F2P) Craftable. Good ATK stick, but requires hitting a weak point to activate passive, which can be annoying.

Constellation Value

Fischl is great at C0, but C6 transforms her into a machine gun.

  • C2: Devourer of All Sins - (AoE Nuke) Nightrider (Skill) deals an additional 200% ATK as damage and has increased AoE on cast.
  • C6: Evernight Raven - (The Machine Gun) Extends Oz duration by 2s. Additionally, Oz performs a coordinated attack with your active character's Normal Attacks, dealing 30% of Fischl's ATK as Electro DMG. This applies massive amounts of Electro.

Top Team Compositions

1. Aggravate (BiS)

  • Driver: Keqing / Yae Miko / Clorinde
  • Sub-DPS: Fischl
  • Dendro: Nahida / Baizhu / Kirara
  • Anemo: Kazuha / Sucrose

Why it works: Electro characters trigger reactions > Fischl A4 triggers > Fischl A4 applies Electro > Fischl A4 Aggravates. It is a feedback loop of damage. Fischl often out-damages the main carry here.

2. Taser (Electro-Charged)

  • Driver: Sucrose / Heizou / Ayato
  • Sub-DPS 1: Beidou
  • Sub-DPS 2: Fischl
  • Hydro: Xingqiu / Yelan

Why it works: Classic team. Fischl batteries Beidou (who is energy hungry) while dealing high single target damage to complement Beidou's AoE.

Rotations & Combos

The Infinite Oz Loop:
Fischl E (Summon Oz) > Team Rotation (10-12s) > Fischl Q (Refresh Oz) > Team Rotation (10-12s) > Fischl E...

Tip: Don't use Q if Oz is already on field, as it just resets the position, not the duration. Wait for Oz to disappear or be about to expire before using Burst.

Frequently Asked Questions

Is Physical Fischl good?
It's viable in early game, but Electro Sub-DPS Fischl deals significantly more damage in optimized teams. Physical builds ("Machine Gun Fischl") require Yun Jin and Mika to be competitive.

Stringless vs. 5-Stars?
An R5 Stringless is often better than R1 Skyward Harp or Amos Bow because the passive (48% Skill DMG) and EM substat are perfect for Aggravate. Aqua Simulacra and Polar Star are slightly better stat sticks.

Data Source: KQM Standards. Last Updated: December 2025

Electro Traveler Guide: The Definitive Build & Analysis

Electro Traveler, The Universal Battery

Electro Traveler Genshin Impact Character Art
Rarity (5-Star Free)
Element Electro
Weapon Sword
Best Role Battery / Burst Support
Stat Priority ER > CRIT > ATK
Tier B (Niche Battery)

After resonating with a Statue of the Seven in Inazuma, the Traveler gains the power of Electro. Unlike their Anemo or Geo forms, the Electro Traveler is a dedicated Battery Support. Their kit revolves around funneling massive amounts of flat Energy and Energy Recharge to teammates, making them a best-in-slot support for energy-hungry carries like Eula or Xiao.


Pros

  • Best single-target battery in the game (Amulets).
  • Completely F2P friendly (Free C6 + Free Weapon).
  • Increases teammates' Energy Recharge stat (Skill).
  • Burst provides off-field Electro application.
  • High synergy with "The Exile" or "Noblesse" sets.

Cons

  • Low Damage: Personal damage is negligible compared to Fischl/Beidou.
  • Clunky Mechanics: Teammates must manually pick up Amulets.
  • Long cooldown on Elemental Skill (mitigated by A1).
  • Burst damage multipliers are relatively low.

Quick Guide (TL;DR)

Electro Traveler is built purely to keep your Main DPS's burst ready on cooldown.

  • Best Artifact: 4pc Emblem of Severed Fate (Personal ER/Dmg) or 4pc Noblesse Oblige (Team Buff).
  • Best Weapon: Favonius Sword (Essential).
  • Alt Weapon: Sacrificial Sword or Festering Desire.
  • F2P Weapon: Amenoma Kageuchi or Skyward Blade.
  • Main Stats: SANDS: ER% (Mandatory) | GOBLET: Electro DMG | CIRCLET: CRIT Rate (for Favonius).
  • Talent Priority: Elemental Burst > Elemental Skill > Normal Attack (Ignore).
  • Top Team: Eula + Electro Traveler + Rosaria + Zhongli (Superconduct Battery).
Pro Tip: Amulet Feeding: Use Traveler's Skill (E), then immediately swap to your Main DPS (e.g., Eula or Xiao) so they pick up the Abundance Amulets. This grants them flat Energy and a massive Energy Recharge buff.

Need Genesis Crystals?

Get Genesis Crystals at a discounted price with instant delivery.

Top Up Secure & Fast via GameCharge

Talent Materials (Inazuma)

Note: Traveler uses standard Mondstadt materials (Windwheel Aster/Masks) for Ascension Level, but Inazuma materials for Electro Talents.

Category Material Name Source
Talent Books Transience / Elegance / Light Violet Court (Rotates Daily)
Common Mob Handguards Nobushi / Kairagi (Inazuma)
Weekly Boss Dragon Lord's Crown Azhdaha (Liyue)

Talent Breakdown & Mechanics

Elemental Skill: Lightning Blade

  • Mechanic: Unleashes three swift thunder shadows. Upon hitting an opponent, they leave behind Abundance Amulets (Max 2 initially, 3 at C1).
  • The Buff: When a character picks up an Amulet, they restore Energy and their Energy Recharge is increased by 20% (Talent Lvl 7+) for 6s.
  • Cooldown: 13.5s (Reduced by picking up amulets via A1 Passive).

Elemental Burst: Bellowing Thunder

  • Mechanic: Calls upon lightning to shroud the active character. When the active character hits with Normal or Charged Attacks, Falling Thunder strikes deal Electro DMG.
  • Battery Effect: When Falling Thunder hits, it restores Energy to the active character (0.8 - 1.0 Energy per hit).
  • Application: Good for applying Electro off-field for reactions like Superconduct or Electro-Charged.

Talent Priority Order:

  1. Elemental Burst (Level 9) - Increases Energy restoration per hit.
  2. Elemental Skill (Level 7+) - Increases ER buff percentage.
  3. Normal Attack (Level 1) - Completely useless for support build.

Stat Requirements & ER Thresholds

Electro Traveler needs massive ER to fund their own 80-cost burst, as they usually funnel their own particles to teammates.

Weapon Artifact Set ER Requirement
Favonius Sword Emblem / Noblesse 220% - 250%
Amenoma Kageuchi Any 180% - 200% (Passive helps)
Non-ER Weapon Any 280%+ (Not Recommended)

Substat Priority:

  1. Energy Recharge (Stack as much as possible)
  2. CRIT Rate (Required to proc Favonius Sword passive)
  3. ATK% / Electro DMG (Bonus damage)
  4. Elemental Mastery (Only for Hyperbloom meme builds)

Best Artifacts Comparison

Set Name Role Reasoning
4pc Emblem of Severed Fate Best Personal Converts the massive amount of ER you are building into Burst DMG. Offers the best personal damage output.
4pc Noblesse Oblige Team Support Grants 20% ATK to the team upon Burst. Great utility since Traveler's personal damage is low anyway.
4pc The Exile (4-Star) Pure Battery Restores energy to the entire team after using Burst. Incredible for energy-starved teams, but lowers Traveler's stats due to 4-star cap.

Weapon Rankings

Weapon Type Performance Notes
Favonius Sword Energy Recharge S+ The undisputed king. Generates white particles for the whole team. Matches Traveler's kit perfectly.
Sacrificial Sword Energy Recharge A Allows double casting E for double Amulets. Good, but extends rotation time significantly.
Amenoma Kageuchi ATK% A (F2P) Craftable Inazuma sword. The passive refunds energy after Burst, lowering ER requirements drastically.
Skyward Blade Energy Recharge A (5-Star) High Base ATK and ER substat. A solid stat stick if you have it lying around.

Constellation Value

All Traveler constellations are free. C4 and C6 turn them into a premier support.

  • C4: Fickle Cloudstrike - (Battery Buff) If a character picking up an Amulet has less than 35% Energy, the Energy restored is increased by 100%. This is insane for empty bursts.
  • C6: World-Shaker - (Res Shred) Falling Thunder (Burst) damage increases and shreds opponent's Electro RES by 15%. Great for supporting other Electro units like Beidou.

Top Team Compositions

1. Eula Physical Support

  • Main DPS: Eula
  • Battery: Electro Traveler
  • Sub-DPS: Rosaria / Raiden Shogun
  • Sustain: Zhongli / Diona

Why it works: Eula is notorious for Energy issues. Traveler provides Electro for Superconduct (Phys Shred) and feeds Eula energy via Amulets, allowing Eula to run 0% ER on artifacts.

2. F2P Taser

  • Driver: Sucrose / Heizou
  • Off-Field DPS: Beidou
  • Battery: Electro Traveler
  • Hydro: Xingqiu

Why it works: Beidou deals massive damage but needs a battery. Traveler at C6 shreds Electro RES, batteries Beidou, and keeps the rotation smooth.

Rotations & Combos

The Funnel Rotation:
Supports Setup > Traveler Q > Traveler E > Swap to Main DPS immediately > Main DPS Catch Amulets & Particles

Tip: Always Cast Burst (Q) *before* Skill (E). The Skill produces the Amulets. If you cast Skill then Burst, you waste time in the animation while the Amulets are sitting on the floor waiting to be picked up.

Frequently Asked Questions

Is Electro better than Dendro Traveler?
Generally, no. Dendro Traveler (DMC) is meta-defining for Dendro teams. Electro Traveler is a niche battery. Only use Electro if you specifically need Energy for Eula or Noelle.

Do I need to level talents?
Yes, but you can stop at Skill Lv 7 (max ER buff) and Burst Lv 9. Crowning is not recommended unless you really love the Traveler.

Data Source: KQM Standards. Last Updated: December 2025

Cyno Guide: The Definitive Build & Analysis

Cyno, the General Mahamatra

Cyno Genshin Impact Character Art
Rarity (5-Star Limited)
Element Electro
Weapon Polearm
Best Role Hyperbloom/Aggravate Carry
Stat Priority EM = CRIT > ATK% > ER
Tier A (With Premium Supports)

Cyno is the General Mahamatra, a fearsome enforcer of the Akademiya. He is a "Selfish Carry" whose kit revolves around his Elemental Burst, entering the Pactsworn Pathclearer state to deal continuous Electro damage. His gameplay is rhythmic, requiring precise timing of his Elemental Skill to match the "Eye" visual indicator.


Pros

  • Excellent damage floor in Quickbloom/Hyperbloom teams.
  • Extremely engaging and rhythmic playstyle (QTE mechanics).
  • High resistance to interruption during Burst.
  • Scales extremely well with Elemental Mastery (EM).
  • White Tassel (3-star weapon) is surprisingly competitive.

Cons

  • Burst Reliant: Does negligible damage outside of Burst.
  • Long Field Time: Requires ~18s on field, outlasting most buffs (e.g., Bennett, Kazuha).
  • High Energy Recharge requirements without a battery.
  • Cannot swap out during Burst without ending it early.

Quick Guide (TL;DR)

Cyno demands a specific team structure to support his long on-field duration.

  • Best Artifact: 4pc Thundering Fury (Best Gameplay/Energy) or 4pc Gilded Dreams (Stat Stick).
  • Best Weapon: Staff of the Scarlet Sands (Signature).
  • Alt Weapon: Primordial Jade Winged-Spear or Staff of Homa.
  • F2P Weapon: White Tassel (R5 3-Star from Liyue Chests) or Kitain Cross Spear.
  • Main Stats: SANDS: EM (Preferred) or ATK% | GOBLET: Electro DMG | CIRCLET: CRIT.
  • Talent Priority: Elemental Burst > Elemental Skill > Normal Attack (Ignore NA).
  • Top Team: Cyno + Furina + Nahida + Baizhu (Premium Quickbloom).
Pro Tip: The Eye of the Storm: During his Burst, a giant eye symbol will flash on screen at intervals. You MUST use your Elemental Skill (E) exactly when this eye appears. This triggers the "Judication" effect, dealing 35% more damage and firing off 3 Duststalker Bolts.

Pulling for Staff of the Scarlet Sands?

Ensure you have enough Primogems for the weapon banner pity.

Top Up Secure & Fast via GameCharge

Ascension & Talent Materials

Category Material Name Source
Ascension Scarabs Sumeru Desert (Rolling balls in sand)
Boss Drop Thunderclap Fruitcore Electro Regisvine (Sumeru)
Talent Books Teachings of Admonition Steeple of Ignorance (Mon/Thu/Sun)
Common Mob Samachurl Scrolls Samachurls (Everywhere)

Talent Breakdown & Mechanics

Normal Attack: Invoker's Spear

  • Usage: Rarely used outside of Burst. You should NOT level this talent as his Burst uses separate scaling.

Elemental Burst: Sacred Rite: Wolf's Swiftness

  • Transformation: Cyno enters the Pactsworn Pathclearer state. His Normal, Charged, and Plunging Attacks are converted to Electro DMG (cannot be overridden).
  • EM Buff: He gains 100 Elemental Mastery during this state.
  • Duration: Lasts 10s base, but can extend to 18s by using his Elemental Skill.

Elemental Skill: Secret Rite: Chasmic Soulfarer

  • Normal Form: A simple thrust forward. Generates particles.
  • Burst Form (Mortuary Rite): Unleashes a thunderous slam.
  • A1 Passive (Featherfall Judgment): While in Burst, an "Eye" symbol appears on screen at intervals. Using Skill during this window triggers "Judication," increasing damage by 35% and firing 3 Duststalker Bolts that deal 100% ATK as Electro DMG.
  • Thundering Fury Synergy: If wearing 4pc TF, you can use the Skill in between the Eye windows to generate extra energy and damage.

Talent Priority Order:

  1. Elemental Burst (Level 10) - Primary damage source.
  2. Elemental Skill (Level 9) - Duststalker Bolt damage.
  3. Normal Attack (Level 1) - Can be left unlevelled.

Stat Requirements & ER Thresholds

Cyno has an 80-cost burst and generates few particles during his Burst mode if not playing 4pc TF perfectly. ER is critical.

Team Context Artifact Set ER Requirement
Double Electro (Fischl) Thundering Fury 130% - 140%
Double Electro (Fischl) Gilded Dreams 140% - 150%
Solo Electro Any 180%+ (Avoid this)

Substat Priority:

  1. ER% (Until requirement met - DEADLY IMPORTANT)
  2. CRIT Rate / CRIT DMG
  3. Elemental Mastery (Very high value, often equal to Crit)
  4. ATK% (Lower priority than EM with Signature Weapon)

Best Artifacts Comparison

Set Name Role Reasoning
4pc Thundering Fury Best Gameplay Reduces Skill CD, allowing you to use Skill *between* the Eye intervals. This generates significantly more energy, lowers ER requirements, and feels very fast-paced.
4pc Gilded Dreams Stat Stick Provides massive EM and ATK stats. Generally higher raw damage per screenshot, but requires higher ER substats than TF.
4pc Gladiator's Finale Generalist Buffs Normal Attack DMG. Good if you already have great substats, but worse than TF/Gilded in reaction teams.

Weapon Rankings

Weapon Type Performance Notes
Staff of the Scarlet Sands CRIT Rate S+ Tailor-made. Converts EM to ATK. Makes EM Sands indisputably better than ATK Sands.
Primordial Jade Winged-Spear CRIT Rate S High Base ATK and Crit Rate. Stacks passive easily with Cyno's fast attacks.
White Tassel (R5) CRIT Rate A (3-Star) Found in Liyue Chests. 48% Normal Attack DMG bonus at R5 is massive for Cyno. Better than most 4-stars.
Ballad of the Fjords CRIT Rate A (BP) Battle Pass weapon. Provides lots of EM when 3 different elements are in the party (common in Hyperbloom).

Constellation Value

Cyno functions well at C0, but his C2 is a massive damage spike.

  • C1: Ordinance: Unceasing Vigil - (Attack Speed) Increases Normal Attack SPD by 20% during Burst. Makes gameplay smoother and allows more combos.
  • C2: Ceremony: Homecoming of Spirits - (Electro DMG) Normal attacks grant 10% Electro DMG Bonus, stacking up to 50%. This is his best constellation (~20-25% DPS increase).
  • C6: Raiment: Just Wages - (Extra Bolts) Burst attacks trigger extra Duststalker Bolts. Machine gun lightning gameplay.

Top Team Compositions

1. Premium Quickbloom

  • Main DPS: Cyno
  • Hydro: Furina / Yelan / Xingqiu
  • Dendro: Nahida / Baizhu (Baizhu is preferred for multi-wave content)
  • Healer/Flex: Baizhu / Kuki Shinobu / Zhongli

Why it works: Cyno triggers Hyperbloom seeds created by the Hydro+Dendro supports while maintaining Quicken uptime for Aggravate. Furina's long buff duration matches Cyno's field time perfectly.

2. Aggravate Carry

  • Main DPS: Cyno
  • Sub-DPS: Fischl (Essential Battery)
  • Dendro: Nahida / Kirara / YaoYao
  • Anemo/Shield: Kazuha / Zhongli

Why it works: Pure Electro damage. Requires high investment on Cyno's personal damage stats (Crit/ATK). Fischl helps fund his expensive burst.

Rotations & Combos

Standard Thundering Fury Rotation:
Support Setup > Cyno E Q > N2 E > N4 E (Eye) > N4 E (TF Cooldown) > N4 E (Eye)...

Tip: The "N4 E (Eye)" indicates you should perform 4 normal attacks, and then use your Skill exactly when the visual Eye appears on screen. With Thundering Fury, you can fit an extra Skill use between the Eyes.

Frequently Asked Questions

Can I swap out during his Burst?
No. If you swap characters, Cyno's burst ends immediately. This makes him awkward with short buffers like Bennett or Kazuha.

Is EM or ATK Sands better?
EM Sands is almost always better, especially with his signature weapon or in Hyperbloom teams. Only use ATK Sands if it has vastly superior substats and you are not playing Hyperbloom.

Data Source: KQM Standards. Last Updated: December 2025

Keqing Guide: The Definitive Build & Analysis

Keqing, the Yuheng of the Liyue Qixing

Keqing Genshin Impact Character Art
Rarity (5-Star Standard)
Element Electro
Weapon Sword
Best Role Aggravate Main DPS
Stat Priority CRIT > ATK% > EM
Tier A+ (With Dendro)

Keqing is the Yuheng of the Liyue Qixing. Once considered a weaker 5-star, the introduction of Dendro revitalized her kit. Her fast multi-hit Electro application allows her to trigger Aggravate reactions rapidly, turning her lightning-fast swordplay into a storm of damage numbers.


Pros

  • One of the best drivers for Aggravate (Fischl synergy).
  • Extremely mobile and fun playstyle (Teleporting Skill).
  • High i-frame uptime with low cost Burst (40 Energy).
  • Very flexible artifact options (TF, TS, Gilded, 2pc).
  • Easy to build (Ascension gives Crit DMG).

Cons

  • Stamina Issues: Charged Attacks consume 25 stamina and knock small enemies back.
  • Requires Dendro to be competitive in meta.
  • Low single-hit damage numbers (Death by a thousand cuts).
  • Constellations are relatively weak compared to limited 5-stars.

Quick Guide (TL;DR)

If you don't have time for the math, here is the cheat sheet.

  • Best Artifact: 4pc Thundering Fury (Aggravate BiS).
  • Alt Artifact: 4pc Thundersoother or 2pc TF / 2pc ATK.
  • Best Weapon: Mistsplitter Reforged (Signature).
  • Alt Weapon: Primordial Jade Cutter or Haran Geppaku.
  • F2P Weapon: Iron Sting (Craftable) or Lion's Roar (Best 4-Star at R5).
  • Main Stats: SANDS: ATK% or EM | GOBLET: Electro DMG | CIRCLET: CRIT.
  • Talent Priority: Normal Attack = Elemental Burst > Elemental Skill.
  • Top Team: Keqing + Fischl + Nahida + Kazuha (Premium Aggravate).
Pro Tip: Skill Infusion: Always double-tap her Skill (E -> E) to teleport and infuse her sword with Electro. Do not use a Charged Attack immediately after the first E cast, or you will detonate the stiletto without gaining infusion (Physical Keqing playstyle).

Need Keqing's Opulent Splendor Skin?

Get Genesis Crystals at a discounted price with instant delivery.

Top Up Secure & Fast via GameCharge

Ascension & Talent Materials

Category Material Name Source
Ascension Cor Lapis Liyue (Mt. Hulao, Cliffs)
Boss Drop Lightning Prism Electro Hypostasis (Mondstadt)
Talent Books Teachings of Prosperity Taishan Mansion (Mon/Thu/Sun)
Common Mob Nectar Whopperflowers

Talent Breakdown & Mechanics

Normal Attack: Yunlai Swordsmanship

  • Charged Attack: Keqing's main damage source outside of burst. She disappears and strikes forward.
  • Stamina Cost: Costs 25 stamina. Spamming this depletes stamina very fast, making dodging difficult.
  • Knockback: Sends small enemies flying. In Aggravate teams, you often use N1C (Normal 1 + Charge) combos or just Normal Attacks to preserve stamina.

Elemental Skill: Stellar Restoration

  • Stiletto: Throws a Lightning Stiletto. Can be aimed (hold E).
  • Recast (E -> E): Keqing teleports to the stiletto, dealing AoE Electro DMG and gaining Electro Infusion for 5s (A1 Passive). This is the standard playstyle.
  • Charged Attack Interaction: If you CA after throwing the stiletto, it explodes at its location. This deals damage but does not grant infusion (used for Physical builds, largely obsolete).

Elemental Burst: Starward Sword

  • Cost: 40 Energy | Cooldown: 12s
  • AoE Electro: Unleashes a flurry of slashes ending in a massive AoE strike.
  • Buff (A4 Passive): After casting Burst, Keqing gains 15% CRIT Rate and Energy Recharge for 8s. This makes building her very forgiving.
  • I-Frames: Very long animation invulnerability. Use it to dodge big enemy attacks.

Talent Priority Order:

  1. Normal Attack (Level 10) - Charge Attack scaling.
  2. Elemental Burst (Level 9) - Strong AoE nuke.
  3. Elemental Skill (Level 9) - Integral to rotation.

Stat Requirements & ER Thresholds

Keqing has a cheap 40-cost burst. She rarely needs dedicated ER stats, especially with Fischl (battery) in the team.

Team Context Weapon ER Requirement
Double Electro (Fischl) Any 0% - 110% (Base)
Solo Electro Any 120% - 140%

Substat Priority:

  1. CRIT Rate / CRIT DMG (Target 70/200+)
  2. ATK% (Base scaling)
  3. Elemental Mastery (Aggravate DMG - Aim for ~100-200)
  4. Energy Recharge (Low priority)

Best Artifacts Comparison

Set Name Role Reasoning
4pc Thundering Fury BiS Aggravate Increases Aggravate DMG and reduces Skill CD. This allows Keqing to spam E more often, generating more energy and triggering more Aggravates (since E has no ICD on recast).
4pc Thundersoother Mon/Aggravate 35% DMG Bonus against enemies with Electro aura. Consistent uptime in Electro/Dendro teams. Very strong if you have good substats.
4pc Gilded Dreams EM/ATK Provides lots of EM and ATK. Solid option if you don't want to farm TF.
2pc TF / 2pc ATK Transitional Standard mixed set. Good balance of stats.

Weapon Rankings

Weapon Type Performance Notes
Mistsplitter Reforged CRIT DMG S+ Signature-tier. Massive Crit DMG and Elemental DMG bonus. Keqing stacks it fully (Normal Attack infusion + Burst + Skill).
Primordial Jade Cutter CRIT Rate S Huge Crit Rate stick. Makes building artifacts extremely easy.
Lion's Roar (R5) ATK% S (4-Star) Passive increases DMG against enemies affected by Electro. In Aggravate/Electro-Charged, this has 100% uptime. Beats many 5-stars at R5.
Iron Sting EM A (F2P) Craftable. EM substat is great for Aggravate. Passive increases all DMG. Solid starter.

Constellation Value

Keqing's constellations are standard banner quality (aka low impact), but C4 and C6 help.

  • C1: Thundering Might - (Minor DMG) Skill recast deals 50% ATK AoE damage at start and end points. Small DPS increase.
  • C4: Attunement - (ATK Buff) Triggering Electro reactions increases ATK by 25% for 10s. Very consistent uptime in Aggravate.
  • C6: Tenacious Star - (Electro DMG) Abilities grant 6% Electro DMG Bonus each (Max 24%). Nice boost to overall output.

Verdict: C0 is perfectly fine. Don't chase cons, you'll lose 50/50s to her eventually.

Top Team Compositions

1. Premium Aggravate

  • Main DPS: Keqing
  • Sub-DPS: Fischl (A4 Passive abuse)
  • Dendro: Nahida / Baizhu / Kirara
  • Anemo: Kazuha / Sucrose

Why it works: Keqing applies Electro incredibly fast with N1C/Skill/Burst. This triggers Fischl's A4 passive (Lightning Smite) repeatedly. Kazuha swirls Electro for RES shred. Nahida keeps Quicken aura up. It is a rapid-fire reaction team.

2. F2P Aggravate

  • Main DPS: Keqing
  • Sub-DPS: Fischl / Beidou
  • Dendro: Dendro Traveler / Collei
  • Healer/Shield: YaoYao / Kuki Shinobu

Why it works: Same principle as above but with accessible units. Dendro MC provides long off-field Dendro app. YaoYao heals.

Rotations & Combos

Aggravate Rotation (TF):
Fischl E > Kazuha E Q > Nahida E Q > Keqing E Q E N1C N1C...

Tip: If using 4pc Thundering Fury, you can weave extra Skills (E) into your combo because the cooldown resets. E.g., EQE -> N1C -> E -> N1C. This generates more energy and i-frames.

Frequently Asked Questions

Is Physical Keqing good?
No. It wastes her teleport, her burst, and her infusion. Aggravate deals significantly more damage with less stamina consumption. Only play Physical for memes or early game.

Why do I run out of stamina?
Charged Attack spam is expensive. Try mixing in Normal Attacks (N4) or using Skill/Burst to let stamina regenerate. In Aggravate, N1C (Normal 1 + Charge) is efficient.

Data Source: KQM Standards. Last Updated: December 2025

Yae Miko Guide: The Definitive Build & Analysis

Yae Miko, the Guuji of the Grand Narukami Shrine

Yae Miko Genshin Impact Character Art
Rarity (5-Star)
Element Electro
Weapon Catalyst
Best Role Off-Field Sub-DPS
Stat Priority CRIT > ATK% > EM
Tier S (Aggravate Queen)

Yae Miko is the Guuji of the Grand Narukami Shrine and an Electro Catalyst user who specializes in consistent off-field damage. Her "Sesshou Sakura" turrets automatically target enemies, dealing damage regardless of distance. With the introduction of Dendro, her value skyrocketed in Aggravate teams.


Pros

  • High consistent off-field damage (100% uptime).
  • Excellent synergy with Dendro (Aggravate/Spread).
  • Burst provides massive AoE nuke capability.
  • Auto-targeting hits flying enemies (e.g., Specters).
  • Scales with Elemental Mastery (Double dipping stats).

Cons

  • Field time requirement can be high (EEE -> Q -> EEE).
  • Zero resistance to interruption while casting Skill.
  • Highest Burst cost in the game (90 Energy).
  • Turrets have no snapshotting (Dynamic stats).

Quick Guide (TL;DR)

If you don't have time for the math, here is the cheat sheet.

  • Best Artifact: 4pc Golden Troupe (BiS - 70% Skill DMG).
  • Alt Artifact: 4pc Gilded Dreams (Aggravate) or 2pc/2pc ATK/Electro/EM.
  • Best Weapon: Kagura's Verity (Signature).
  • Alt Weapon: Skyward Atlas or Lost Prayer.
  • F2P Weapon: The Widsith (RNG God) or Oathsworn Eye (Event).
  • Main Stats: SANDS: ATK% or EM | GOBLET: Electro DMG | CIRCLET: CRIT.
  • Talent Priority: Elemental Skill > Elemental Burst > Normal Attack (Ignore).
  • Top Team: Yae Miko + Nahida + Fischl + Kazuha/Zhongli (Aggravate).
Pro Tip: The Triangle: Always deploy your 3 Sesshou Sakura turrets in a triangle formation or simply link them together. The turrets level up (increasing damage) only when they are near other turrets. A lone turret deals significantly less damage.

Need Primogems for Kagura's Verity?

Get Genesis Crystals at a discounted price with instant delivery.

Top Up Secure & Fast via GameCharge

Ascension & Talent Materials

Category Material Name Source
Ascension Sea Ganoderma Inazuma (Coasts)
Boss Drop Dragonheir's False Fin Bathysmal Vishap Herd (Enkanomiya)
Talent Books Teachings of Light Violet Court (Wed/Sat/Sun)
Common Mob Handguards Nobushi / Kairagi (Inazuma)

Talent Breakdown & Mechanics

Elemental Skill: Yakan Evocation: Sesshou Sakura

  • The Turrets: Leaves a "Sesshou Sakura" totem. You can have up to 3 at once.
  • Leveling Up: If placed near each other, the turrets level up (Level 1 -> 2 -> 3), increasing damage significantly. Always link them!
  • Duration: 14s duration, 4s cooldown. 100% uptime is easy.
  • Energy: Generates 1 particle every ~3 seconds (RNG).

Elemental Burst: Great Secret Art: Tenko Kenshin

  • Cost: 90 Energy | Cooldown: 22s
  • The Nuke: Strikes with a thunderbolt. If Sesshou Sakura are present, they are destroyed and turn into Tenko Thunderbolts, dealing massive AoE damage.
  • Reset Mechanic: When the burst destroys turrets, her passive (The Shrine's Sacred Shade) resets the cooldown of her Skill, allowing you to redeploy all 3 immediately.

Passive: Enlightened Blessing

  • EM Scaling: Every point of Elemental Mastery increases Sesshou Sakura damage by 0.15%. This makes EM a valuable stat for her, especially in Aggravate teams.

Talent Priority Order:

  1. Elemental Skill (Level 10) - 60-70% of her total damage output.
  2. Elemental Burst (Level 9) - Strong nuke, but expensive.
  3. Normal Attack (Level 1) - Ignore (Unless C6 on-field memes).

Stat Requirements & ER Thresholds

Yae Miko has a 90-cost burst. If you want to burst every rotation, you need ER. If you skip burst every other rotation (common), you need less.

Team Context Burst Frequency ER Requirement
Double Electro (Fischl) Every Rotation 140% - 150%
Double Electro (Fischl) Every Other Rotation 100% - 110%
Solo Electro (Raiden) Every Rotation 130% - 140%

Substat Priority:

  1. CRIT Rate / CRIT DMG (Target 75/160+)
  2. ATK% (Base scaling)
  3. Elemental Mastery (Aggravate scaling)
  4. Energy Recharge (Comfort)

Best Artifacts Comparison

Set Name Role Reasoning
4pc Golden Troupe BiS Increases Skill DMG by 70%. Since Yae's turrets are 70% of her output, this set is mathematically superior to Gilded/Thundering Fury in almost all cases.
4pc Gilded Dreams Aggravate Good for reaction damage (EM buff). Strong if you burst often or lack good Golden Troupe pieces.
2pc ATK / 2pc Electro Flexible Easiest to build. Very competitive due to better substats usually available on 2pc sets.

Weapon Rankings

Weapon Type Performance Notes
Kagura's Verity CRIT DMG S+ Signature. Tailor-made for her E spam. Stacks DMG bonus perfectly.
The Widsith (R5) CRIT DMG S (RNG) The "6-Star Weapon." All 3 buffs (ATK, DMG%, EM) benefit Yae Miko immensely.
Skyward Atlas ATK% S Solid consistent damage. High Base ATK helps scaling.
Oathsworn Eye ATK% A (F2P) Event Weapon. Increases ER after using skill. Helps with burst uptime.

Constellation Value

Yae Miko scales very well with constellations.

  • C1: Yakan Offering - (Energy) Restores 8 Energy for every thunderbolt triggered by Burst (Total 24). Massive QoL that lowers ER needs to ~110%.
  • C2: Fox's Mooncall - (Range/DMG) Turrets start at Level 2 and go up to Level 4. Increases range by 60% (sniper mode). Significant damage increase (~25%).
  • C6: Forbidden Art: Daisesshou - (DEF Shred) Sesshou Sakura attacks ignore 60% of enemy DEF. This is a massive damage multiplier, similar to Raiden C2.

Verdict: C0 is fine. C2 is great for range. C6 is a monster.

Top Team Compositions

1. Premium Aggravate

  • Sub-DPS: Yae Miko
  • Driver/DPS: Raiden Shogun / Keqing
  • Dendro: Nahida / Baizhu
  • Anemo: Kazuha

Why it works: Dendro + Electro = Quicken. Yae's turrets apply Electro frequently, triggering Aggravate (flat damage bonus based on EM) on almost every hit.

2. AFK Turret Team

  • Turret 1: Yae Miko
  • Turret 2: Furina (Golden Troupe)
  • Turret 3: Nahida (Tri-Karma)
  • Healer/Shield: Zhongli / Baizhu

Why it works: The "lazy" team. Deploy skills, stand back, and watch enemies die to auto-targeting projectiles. Extremely effective for overworld and Abyss mobbing.

Rotations & Combos

The "EEEQEEE" Combo:
Yae E E E > Supports/DPS Rotation > Yae Q > Yae E E E

Tip: You don't need to Burst every rotation. It takes a lot of field time to redeploy totems. Bursting every other rotation is often optimal for team DPS flow.

Frequently Asked Questions

Yae Miko vs. Fischl?
Fischl (C6) generates more particles and requires less field time. Yae Miko deals higher AoE damage and has a massive burst nuke. Use both together in Aggravate for maximum destruction.

Is EM or ATK sands better?
For **Aggravate**, EM Sands is slightly better or equal to ATK%. For **Raw Electro** (Raiden teams), ATK% is better. Substats usually decide the winner.

Data Source: KQM Standards. Last Updated: December 2025