
Note: For the best experience, please view in landscape mode
1. INTRODUCTION
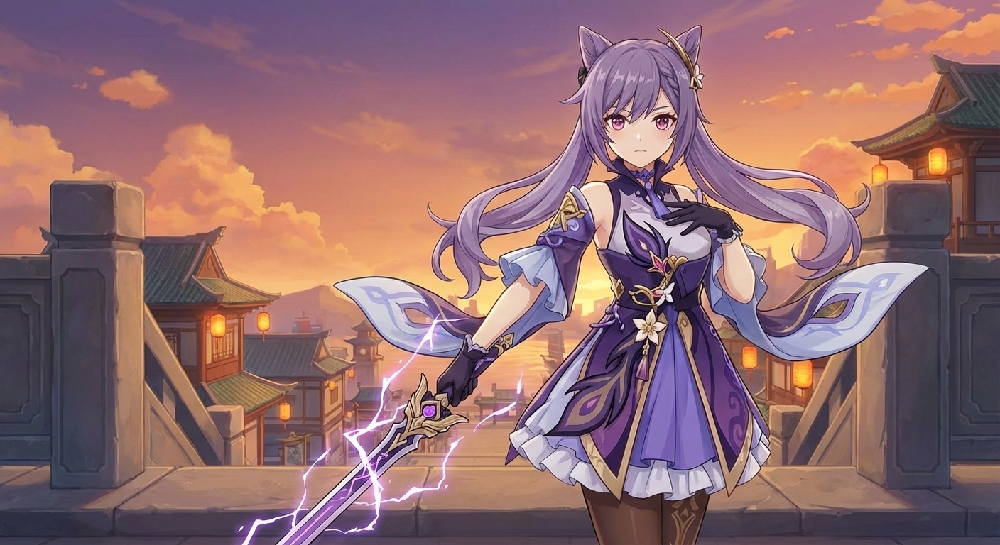
Welcome to GAMECHARGE’s guide to Keqing! As a 5-Star Electro character, Keqing brings a versatile toolkit to the table, featuring unique movement mechanics that spice up both combat and open-world exploration. Because she relies heavily on her raw power to deal damage, she remains a highly flexible unit to build around.
While this guide focuses on the most optimal strategies and builds, it is important to remember that Keqing is fully functional even without perfect min-maxing. If you are already clearing content comfortably, don't feel pressured to follow this guide strictly—the most important thing is to play the game the way you enjoy it most!
With that disclaimer out of the way, let's get started!
If you are just looking for a quick summary, check out the TL;DR infographics below for her best builds (click to expand).
CLICK HERE TO TOPUP GENESIS CRYSTALS (PROMO PRICE)
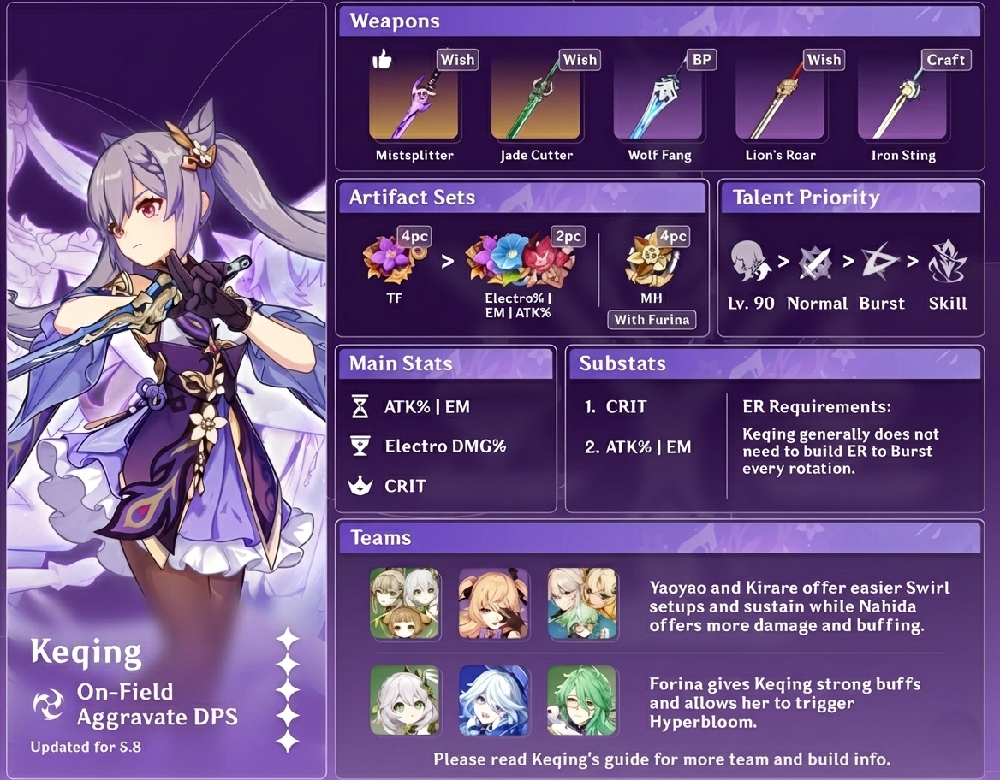
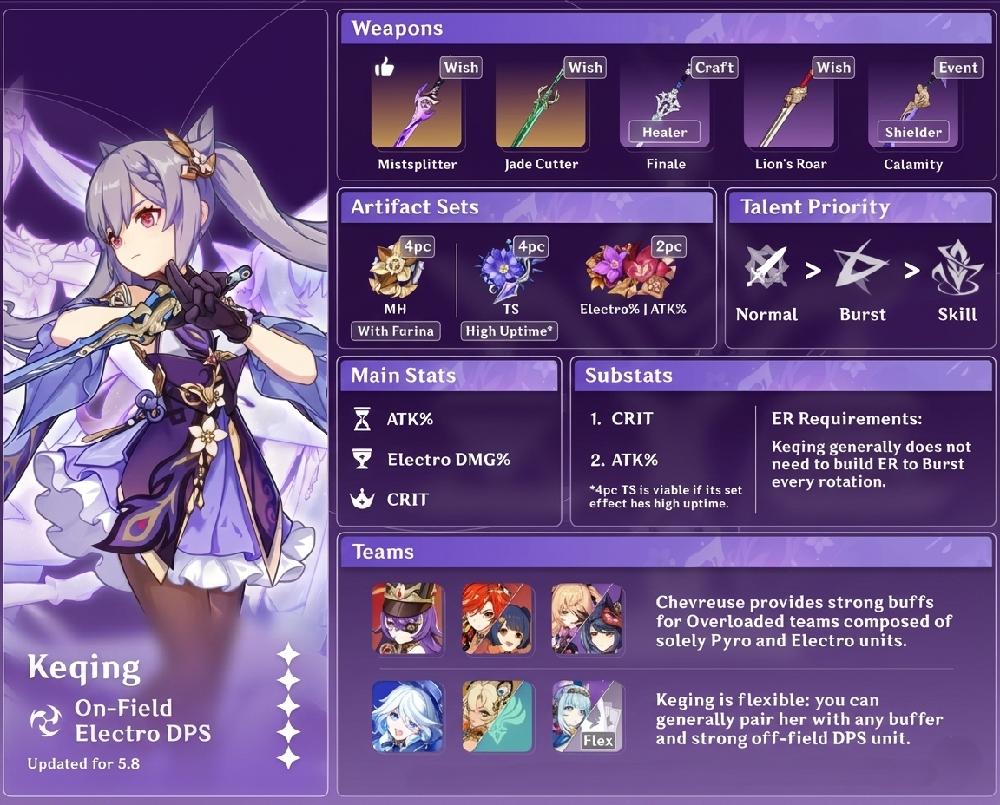
2. TL;DR
3. TALENT

Talent Priority: Min-Maxing Your Kit
Sustained Electro & Aggravate (The Meta) For the standard Electro playstyle, your Charged Attacks are your bread and butter. Even in Aggravate comps, your Normal Attack (NA) talent dictates your highest DPS output.
-
Priority: Normal Attack > Burst > Skill
-
Note: In Aggravate teams, your Burst and Skill contribute significant reaction damage, so level them equally, but don't neglect that NA talent.
CRITICAL TIP: LEVEL 90 IS MANDATORY If you are running an Aggravate setup, you must push Keqing to Level 90. Reaction damage scaling from level 80 to 90 is massive. Don't leave free DPS on the table!
Talents Overview
1. Normal attack: Yunlai Swordsmanship
1. Normal Attack - Keqing performs up to 5 consecutive strikes.
2. Charged Attack - Keqing consumes 25 Stamina to unleash 2 rapid sword strikes.
Combo Optimization & Stamina Management
For any on-field Keqing build, your Charged Attack (CA) is the engine of your damage. The absolute highest DPS rotation is the N1C combo (1 Normal Attack canceled into a Charged Attack). Spamming this is how you get those big numbers.
The Mechanical Hurdles While N1C is optimal, it comes with two major drawbacks you need to play around:
-
The Stamina Tax: At 25 Stamina per pop (the highest of any Sword user), you will drain your bar fast.
-
Knockback: You will literally launch light enemies out of your range, forcing you to dash (wasting even more stamina) to chase them.
The Solution: The N4C Weaver Don't let your tank run empty. When your stamina starts looking low, switch your combo to N4C (4 Normal Attacks into a Charged Attack).
-
Why? This rotation is her second-best for DPS, but significantly easier on your stamina bar.
-
Result: It gives you breathing room to regenerate resources without suffering a massive drop in damage output.
Gap Closing: Handling Knockback
When your Charged Attacks launch small enemies out of melee range, you have two tech options to close the distance:
1. The Jump Cancel (Optimal Economy) Simply jump towards the enemy to reposition.
-
Pro: Costs 0 Stamina, saving your bar for more attacks.
-
Con: Mechanically clunky and can be annoying to execute consistently during intense combat.
2. The Dash Cancel (Comfort Pick) Dash forward to chase the enemy.
-
Pro: Much smoother gameplay flow; easier to execute.
-
Con: Wrecks your Stamina economy. combining the cost of the dash with your expensive Charged Attacks will drain you instantly.
The Verdict: Use Jump if you're min-maxing stamina; use Dash if you have the spare resources or need the i-frames.
2. Elemental Skill: Stellar Restoration
Elemental Skill: Stellar Restoration
-
Tap (Press): Keqing hurls a Lightning Stiletto at the enemy, dealing initial AoE Electro DMG and planting a Stiletto Mark that lasts for 5 seconds.
-
Hold: Enters aiming mode. You can adjust the trajectory to place the Stiletto Mark exactly where you want it—even suspended in mid-air.
Once the Mark is active, you have two follow-up options:
-
The Blink (Recast E): Press the skill again to teleport instantly to the Mark's location. On arrival, she executes a slashing AoE Electro attack.
-
The Detonation (Charged Attack): If you perform a Charged Attack instead of recasting, the Mark explodes remotely. This triggers a Thunderclap Slash at the Mark's location, dealing AoE Electro DMG without teleporting you.
Skill Mechanics: Mastering the Infusion
Your usage of Stellar Restoration (E) defines your entire build. This is where the branching path between Electro and Physical playstyles happens.
The Golden Rule of Recasting
-
Electro Keqing: You want the purple numbers. To get them, you must Recast E. Her Ascension 1 Talent grants her an Electro Infusion for 5 seconds only after she teleports to the mark.
-
Physical Keqing: You want white numbers. You must AVOID recasting E. Instead, perform a Charged Attack while the mark is active. This detonates the mark remotely (Thunderclap Slash) and keeps your damage Physical.
The "Cooldown Desync" Tech Mechanic Alert: The cooldown for Stellar Restoration (7.5s) starts ticking the moment you throw the Stiletto, not when you teleport.
We can abuse this mechanic to maximize your Electro uptime. Since the Electro Infusion always lasts 5 seconds regardless of when you teleport, delaying the teleport effectively "shortens" the cooldown for your next rotation.
Scenario 1: The Panic Cast
-
Action: E (Throw) > E (Teleport instantly)
-
Result: Your cooldown and infusion start at nearly the same time. When the 5s infusion wears off, your Skill will still be on a 2s cooldown.
-
Outcome: Awkward downtime with physical auto-attacks.
Scenario 2: The Optimal Weave
-
Action: E (Throw) > Q (Burst) > E (Teleport)
-
Result: By casting Burst while the Stiletto is in the air, you burn time while the Skill cooldown ticks down in the background.
-
Outcome: When your infusion ends, your Skill is instantly ready again. Infinite Purple uptime.
Note: If you are equipping Mistsplitter Reforged (stack management) or the 4-Piece Thundering Fury set (cooldown reduction), you have more freedom and don't strictly need to follow Scenario 2.
CLICK HERE TO TOP UP ONEIRIC SHARD (PROMO PRICE)
CLICK HERE TO TOPUP GENESIS CRYSTALS (PROMO PRICE)
3. Elemental Burst: Starward Sword
Keqing executes a massive AoE nuke sequence in three stages: she opens with an initial Electro blast, shreds nearby enemies with 8 rapid consecutive strikes, and ends the combo with a heavy final slashing finisher.
AoE & Utility This is your primary solution for clearing mobs. Because the Burst hits 10 times in rapid succession, the aggregate motion value (total damage multiplier) is massive. Crucially, casting this is mandatory to trigger her Ascension 4 Talent, which grants her a free Crit Rate buff.
When to Skip It While powerful, pressing Q isn't always the right move. In specific Driver Keqing setups, the long animation time results in a DPS loss compared to just spamming attacks. (We cover this specific rotation in the Teams & Synergies section).
4. Passive Talent: Land’s Overseer
When dispatched on an expedition in Liyue, time consumed is reduced by 25%. Keqing knows her way around Liyue so she’ll get you your fruits and Mora faster!
5. Ascension 1: Thundering Penance
This passive is the cornerstone of Electro Keqing, granting her weapon an Electro Infusion for 5 seconds immediately after teleporting with her Skill. However, be aware that this infusion has very low priority and will be overridden by almost any other elemental conversion effect in the game; if you stand in Chongyun’s Cryo field or Bennett’s C6 Pyro zone, your attacks will lose their Electro properties, so build your team carefully to avoid canceling out your own damage. This Talent is the reason Sustained Electro Keqing exists. Infusion can simply be avoided by casting a Charged Attack while a Stiletto is present.
6. Ascension Talent 4: Aristocratic Dignity
This passive is essentially free stats, providing a massive value spike by granting 15% Crit Rate and a boost to Energy Recharge. This significantly lowers the pressure on your artifact farming, allowing you to focus on stacking Crit Damage or Attack while still easily hitting your consistency breakpoints. The added Energy Recharge also smooths out your rotations, ensuring that you can keep casting Starward Sword off cooldown without needing dedicated battery units.
Mechanically, the 8-second timer for this buff begins the exact frame you cast your Elemental Burst, not when the animation ends. This is actually perfect for your damage output, as the 15% Crit Rate bonus applies to the Burst hits themselves. Once the Burst animation concludes, you are left with approximately 5 seconds of the buff remaining to unleash your Charged Attack combos with elevated consistency.
4. Constellations
Keqing’s Constellations are heavily biased toward the Electro playstyle, offering almost no value for Physical builds. Rather than introducing complex new mechanics or altering her rotations, these upgrades act as pure damage amplifiers—allowing you to keep your existing playstyle while simply outputting significantly higher DPS.
Note: The following DPS increase percentages were calculated for Electro Keqing only.
C1: Thundering Might
Recasting Stellar Restoration while a Lightning Stiletto is present causes Keqing to deal 50% of her ATK as AoE Electro DMG at the start point and terminus of her Blink.
A small damage increase for Electro Keqing. Although it is possible to hit an enemy with both instances of the damage, the Skill cast > recast needs to be at point-blank range to get both instances of damage in which is unreliable and difficult to achieve.
Note: Keqing’s C1 shares an ICD with her Elemental Skill, making it not really relevant for Aggravate Keqing.
Damage increase over C0: 1.7%
C2: Keen Extraction
When Keqing’s Normal and Charged Attacks hit opponents affected by Electro, they have a 50% chance of producing an Elemental Particle. This effect can only occur once every 5s.
This Constellation doesn’t do much for Keqing’s already low Energy needs. However, Energy hungry teammates like Sara and Beidou might appreciate the extra Electro particle.
- Damage increase over C1: N/A
- Damage increase over C0: 1.7%
C3: Foreseen Reformation - Increases the Level of Starward Sword by 3.
A damage increase to your Elemental Burst. Nothing more to say as the A4 buffs aren’t affected by Burst levels.
- Damage increase over C2: 4.6%
- Damage increase over C0: 6.4%
C4: Attunement
For 10s after Keqing triggers an Electro-related Elemental Reaction, her ATK is increased by 25%.
25% Attack is nothing to scoff at, especially if you are using a weapon with high Base ATK like Mistsplitter Reforged. To add onto that, some of Keqing’s best team comps utilize Electro-Charged, allowing for high uptime on her C4.
- Damage increase over C3: 12.1%
- Damage increase over C0: 19.3%
C5: Beckoning Stars
Increases the Level of Stellar Restoration by 3
A simple damage increase to Keqing’s Elemental Skill.
- Damage increase over C4: 2.08%
- Damage increase over C0: 21.8%
C6: Tenacious Star
When initiating a Normal Attack, a Charged Attack, Elemental Skill or Elemental Burst, Keqing gains a 6% Electro DMG Bonus for 8s. Effects triggered by Normal Attacks, Charged Attacks, Elemental Skills, and Elemental Bursts are considered independent entities.
Yet another constellation that grants additional damage to Keqing. Although the amount of Electro DMG you get is non-negligible, it is unfortunately a C6 for a 5 star unit, which makes it difficult to recommend.
- Damage increase over C5: 8.4%
- Damage increase over C0: 32%
Overall, it is not recommended to roll for Keqing’s Constellations, especially if you don’t play Electro Keqing. Don’t roll if you seek more damage – only roll if you love the character.
CLICK HERE TO TOP UP ONEIRIC SHARD (PROMO PRICE)
CLICK HERE TO TOPUP GENESIS CRYSTALS (PROMO PRICE)
5. The Builds and Gameplay(s)
5.1 Archetype Showdown: Electro vs. Physical
The verdict? Go Electro.
Physical is a solid stopgap for early-game leveling since you get a free Prototype Rancour at AR10. However, you should transition to Electro as soon as you acquire a Dendro unit to unlock the Aggravate reaction.
Physical falls off hard in the endgame due to poor AoE and lack of reaction scaling. In contrast, Electro Keqing utilizes broken reactions (Aggravate) and benefits from the Viridescent Venerer set, which buffs her entire kit rather than just her auto-attacks. While premium supports like Kazuha skyrocket her Electro damage, the Electro archetype outperforms Physical even without him.
5.2 Electro Keqing
5.2.1 This table shows the pro and con of Electro
| Pro | Con |
|
Scales better than Physical Keqing |
Stamina-heavy playstyle |
|
Keqing’s Constellations buff this playstyle |
In situations where Pyro is present, Overload can be problematic as it can knock enemies out of her range |
|
Grants access to a wide variety of strong off-field DPS characters. |
Keqing’s team DPS relies on having Sub-DPS units that are well investe |
|
Access to consistent Aggravate and Electro-Charged reactions |
|
|
Greater AoE potential than Physical Keqing |
|
|
You can teleport around with our Electro Queen |
5.2.2 Pre AR-45
Spending Resin
Do not waste your Resin farming artifact domains before Adventure Rank 45. The drop rates prior to this milestone are a trap; once you hit AR 45, every domain run guarantees a 5-Star artifact, offering infinitely better value for your stamina. Consequently, you should hoard all your Fragile Resin until this point to mass-farm your endgame gear. In the early game, focus exclusively on "guaranteed" upgrades—Talent books, weapon materials, and character ascension drops—to ensure you are always prepared for World Level power spikes without relying on RNG.
Artifacts
Your Flower and Feather have fixed stats, so focus your attention on the variable slots: lock in ATK% on your Sands and Circlet. Run an ATK% Goblet as a placeholder until you secure an Electro DMG% upgrade.
The Golden Rule: Stats > Sets. Never sacrifice correct main stats just to force a set bonus—it is a DPS loss. Once your main stats are secured, look for early-game set bonuses like Martial Artist, Resolution of Sojourner, Brave Heart, or Berserker to pad your damage.
Weapons
Fortunately the reward for reaching Adventure Rank 10 is the Prototype Rancour. Stick to this weapon until you pull Lion’s Roar or a better weapon.
5.2.3 Aggravate Keqing
Weapons
Calculated with 4 TF. Combo is Skill > Burst > Skill Recast > N1C > N1 > Skill Cast > 2 N1C. 12 Aggravates total. Substats distributed according to our own calculation. Buffed is +60 EM Buff & 20% ATK.
ATK Sands Table
| Weapon | Unbuffed Relative to R1 Lion’s Roar | Buffed Relative to R1 Lion’s Roar | Notes |
| Mistsplitter Reforged | 120.26% | 121.82% | Similar to Non Aggravate Keqing, Mistsplitter is Aggravate Keqing’s BIS. Use Mistsplitter if you have it. |
| Primordial Jade Cutter | 117.83% | 117.80% | The gap between Mistsplitter and Jade Cutter in Aggravate Keqing is much smaller due to the high CRIT RATE, boosting Aggravate’s damage. |
| Haran Geppaku Futsu | 115.34% | 116.77% | Since Keqing Aggravates mostly from her first Normal Attack, Haran’s NA DMG% pushes Aggravate’s damage quite high. On top of that, Haran provides a large amount of CRIT RATE, making this weapon sit at a comfortable top 3 spot. |
| Light of Foliar Incision (6 procs) |
109.92% | 111.40% | Good weapon for Aggravate Keqing but less versatile compared to her other 5* options. Not recommended to pull for her. |
| Freedom Sworn | 112.66% (w/ passive) |
110.96% | Aggravate Keqing appreciates the EM provided by Freedom Sworn, alongside the ATK% buff and the NA / CA buff, pushing this weapon to a comfortable top spot. |
| Toukabou Shigure R5 | 108.13% | 107.12% | Strong in single target scenarios but falls off against multiple enemies. Recommended to use over crafting Iron Sting for Keqing. |
| Summit Shaper (Shielded) | 101.72% (Full uptime |
102.85% (Full uptime) |
Wait HoD is this high up? It is! The amount of CRIT stats provided by this weapon push Aggravate’s damage quite well. However, maintaining the Passive is crucial. |
| Summit Shaper (No Shield) | R1 (100%) R5 (108.81%) |
R1 (100%) R5 (108.81%) |
Aggravate Keqing has nearly 100% uptime on Lion’s Roar’s passive, making it reliable unless you are facing enemies with innate Element. |
| The Black Sword | R1 (99.42%) R5 (104.09%) |
R1 (100.58%) R5 (105.29%) |
The Black Sword remains a strong and consistent option for Keqing, and beats Lion’s Roar with EM / ATK buffs. |
| Iron Sting (2 Stacks) |
R1 (96.9%) R5 (103.6%) |
R1 (96.1%) R5 (102.7%) |
Similar to other EM Weapons, Aggravate Keqing loves the EM provided by this weapon, and at refinement 5, it becomes a strong 4 Star option for her. |
| Aquila Favonia | 96.10% | 96.78% | An ATK stat-stick with not much else going for it. |
| The Alley Flash (Passive On) |
R1 (94.6%) R5 (101.1%) |
R1 (95%) R5 (101.6%) |
Similar to other EM Weapons, Aggravate Keqing appreciates the EM provided by this weapon and carries higher value for Aggravate Keqing compared to Non Aggravate Keqing. |
| Kagotsurube Isshin | 94.1% (1 passive proc, full passive uptime) |
93.8% (1 passive proc, full passive uptime) |
Unfortunately, the lack of CRIT, EM, and DMG buffs weakens Aggravate damage,dropping this weapon’s value by quite a bit compared to Non Aggravate Keqing. |
| Blackcliff Longsword | 91.8% (0 Stacks) |
93.1% (0 Stacks) |
An expensive weapon to obtain with an unreliable passive. Not recommended to buy off the Starglitter shop. |
| The Flute R1 | 90.2% (1 proc) |
90.3% (1 proc) |
A simple ATK% stat-stick with nothing else to provide. The Passive Proc is Physical DMG, not benefiting Electro Keqing. |
| Amenoma Kageuchi |
89% | 88.6% | Unfortunately, Amenoma is outclassed by many weapon choices, and is not recommended to craft for Keqing. |
EM Sands Table
| Weapon | Unbuffed Relative to R1 Lion’s Roar | Buffed Relative to R1 Lion’s Roar | Notes |
| Mistsplitter Reforged | 117.75% | 119.5% | Similar to Non Aggravate Keqing, Mistsplitter is Aggravate Keqing’s BIS. Use Mistsplitter if you have it |
| Primordial Jade Cutter | 117.0% | 117.3% | The gap between Mistsplitter and Jade Cutter in Aggravate Keqing is much smaller due to the high CRIT RATE, boosting Aggravate’s damage. |
| Haran Geppaku Futsu | 114.2% | 115.6% | Since Keqing Aggravates mostly from her first Normal Attack, Haran’s NA DMG% pushes Aggravate’s damage quite high. On top of that, Haran provides a large amount of CRIT RATE, making this weapon sit at a comfortable top 3 spot. |
| Light of Foliar Incision (6 procs) |
111.01% | 112.37% | Good weapon for Aggravate Keqing but less versatile compared to her other 5* options. Not recommended to pull for her. |
| Freedom Sworn | 108.2% (w/ passive) |
107.0% (w/ passive) |
Aggravate Keqing appreciates the EM provided by Freedom Sworn, alongside the ATK% buff and the NA / CA buff, pushing this weapon to a comfortable top spot. |
| Summit Shaper (Shielded) | 105.1% | 104.2% | While Summit Shaper usually needs time to ramp up, Keqing’s Elemental Burst fully stacks this weapon by itself. This, paired with consistent shield uptime, makes Summit Shaper one of Keqing’s top weapons. |
| Toakube Shigure R5 | 105.64% | 105.00% | Strong in single target scenarios but falls off against multiple enemies. Recommended to use over crafting Iron Sting for Keqing. |
| Harbinger of Dawn R5 | 104% (Full uptime) |
104.5% (Full uptime) |
Wait HoD is this high up? It is! The amount of CRIT stats provided by this weapon push Aggravate’s damage quite well. However, maintaining the Passive is crucial. |
| Summit Shaper (No Shield) | 100.4% | 99.9% | Unfortunately the weapon does lose a bit of value without shield uptime. |
| Lion’s Roar (Full uptime) |
R1 (100%) R5 (109%) |
R1 (100%) R5 (109%) |
Aggravate Keqing has nearly 100% uptime on Lion’s Roar’s passive, making it reliable unless you are facing enemies with innate Element. |
| The Black Sword | R1 (99.4%) R5 (104%) |
R1 (100.5%) R5 (105%) |
The Black Sword remains a strong and consistent option for Keqing, and beats Lion’s Roar with EM / ATK buffs. |
| Kagotsurube Isshin | 94.7% (1 passive proc, full passive uptime) |
94.05% (1 passive proc, full passive uptime) |
Unfortunately, the lack of CRIT, EM, and DMG buffs weakens Aggravate damage,dropping this weapon’s value by quite a bit compared to Non Aggravate Keqing. Remains one of Keqing’s strongest F2P option though. |
| Iron Sting (2 Stacks) |
R1 (94.7%) (2 Stacks) R5 (101.3%) |
R1 (94.1%) R5 (100.7%) |
Similar to other EM Weapons, Aggravate Keqing loves the EM provided by this weapon, and at refinement 5, it becomes a strong 4 Star option for her. |
| Aquila Favonia | 93.6% | 94.4% | An ATK stat-stick with not much else going for it. |
| The Alley Flash (Passive On) |
R1 (92.5%) R5 (99%) |
R1 (93.2%) R5 (99.6%) |
Similar to other EM Weapons, Aggravate Keqing appreciates the EM provided by this weapon and carries higher value for Aggravate Keqing compared to Non Aggravate Keqing. |
| Blackcliff Longsword | 91.4% (0 Stacks) |
92.5% (0 Stacks) |
An expensive weapon to obtain with an unreliable passive. Not recommended to buy off the Starglitter shop. |
| The Flute R1 | 90% (1 proc) |
90.1% (1 proc) |
A simple ATK% stat-stick with nothing else to provide. The Passive Proc is Physical DMG, not benefiting Electro Keqing. |
| Amenoma Kageuchi |
89.6% | 89% | Unfortunately, Amenoma is outclassed by many weapon choices, and is not recommended to craft for Keqing. |
Artifacts
By strength order
| 4-Piece Thundering Fury | With the introduction of Aggravate, Keqing can make good use of the 4-Piece set effect, buffing up her Aggravate damage, as well as getting more Skill casts off. The extra skill casts can provide QOL improvements, such as reducing Stamina consumption throughout a rotation, more Energy Particles, and more teleporting |
| 4-Piece Thundersoother | In Aggravate teams, you’re going to generally have high Electro uptime, making the 4-Piece set effect reliable. Extremely competitive with 4-Piece Thundering Fury. |
| 4-Piece Gilded Dreams | Assuming one Electro character and two Non-Electro characters, the EM and ATK buffs are both buffs that Aggravate Keqing wants. Solid option but falls behind the two sets mentioned above by around 4% with ATK Sands, and ~7-9% with EM Sands. |
| 2-Piece TF 2-Piece EM / 2-Piece TF 2-Piece ATK | The strongest 2-Piece mixed sets. Use 2-Piece EM with ATK Sands and 2-Piece ATK with EM Sands to maximize your damage. |
| 2-Piece EM 2-Piece EM / 2-Piece EM 2-Piece ATK / 2-Piece ATK 2-Piece ATK | The difference between these set combinations is marginal. Use the combination with better substats. |
ATK or EM Sands?
In most Aggravate setups, the performance gap between an ATK% and Elemental Mastery Sands is negligible. Always follow the "Substat Rule": simply equip the piece that has better Crit rolls.
The Exception: If you are running 4-Piece Gilded Dreams, strictly prioritize an ATK% Sands. Because the set bonus already floods you with free Mastery, an ATK% main stat scales better here, offering a notable ~3% damage lead over EM.
CLICK HERE TO TOP UP ONEIRIC SHARD (PROMO PRICE)
CLICK HERE TO TOPUP GENESIS CRYSTALS (PROMO PRICE)
5.2.4 Non-Aggravate Keqing
Weapons
These are sorted by order of strongest to weakest out of the list. Weapons that are not mentioned are not strong enough to be worth considering.
| Weapon | Buffless relative to R1 Black Sword | Kazuha Buff relative to R1 Black Sword | Bennett Buff relative to R1 Black Sword | Notes |
Mistsplitter Reforged (3 Stacks) |
R1 (131%) R5 (159%) |
R1 (128%) R5 (151%) |
R1 (127%) R5 (154%) |
Best-in-slot option for Sustained Electro Keqing. Mistsplitter offers 44.1% CRIT DMG alongside a very high Base Attack and an extremely strong passive, which Keqing has an easy time maintaining. Mistsplitter loses to Jade Cutter in teams that forgo Keqing’s Elemental Burst |
Jade Cutter |
R1 (119%) R5 (136%) |
R1 (121%) R5 (138%) |
R1 (115%) R5 (128%) |
Jade Cutter was previously Electro Keqing’s Best-in-slot up until Mistsplitter’s release. This sword offers 44% CRIT Rate for free without conditional passives which is immensely valuable. |
Haran Geppaku Futsu |
R1 (118%) R5 (130%) |
R1 (117%) R5 (127%) |
R1 (115%) R5 (127%) |
Although Haran only buffs Keqing’s Normal Attacks, it provides a non-negligible Elemental DMG buff, as well as high amounts of CRIT Rate, making it a strong weapon for Keqing. |
Summit Shaper (Shielded) |
R1 (116%) R5 (130%) |
R1 (117%) R5 (132%) |
R1 (107%) R5 (118%) |
While Summit Shaper usually needs time to ramp up, Keqing’s Elemental Burst fully stacks this weapon by itself. This, paired with consistent shield uptime, makes Summit Shaper one of Keqing’s top weapons. |
Summit Shaper (No Shield) |
R1 (109%) R5 (116%) |
R1 (110%) R5 (117%) |
R1 (101%) R5 (107%) |
Unfortunately the weapon does lose a bit of value without shield uptime. However, it still remains a top option for Keqing. |
Aquila Favonia |
R1 (103%) R5 (115%) |
R1 (103%) R5 (114%) |
R1 (98.4%) R5 (108.3%) |
Regardless of the Physical DMG% secondary stat, the Aquila Favonia comes equipped with the highest Base ATK a sword can offer, as well as a 20% ATK bonus for your character, making it viable on Electro Keqing. |
 Lion’s Roar (Full uptime) |
R1 (102%) R5 (112%) |
R1 (101%) R5 (109%) |
R1 (98.9%) R5 (108.4%) |
Keqing’s best 4 star weapon in Electro-focused teams or teams that utilize the Electro-Charged reaction. Maintaining the passive is a big part of this weapon’s strength, which should not be a problem for Electro Keqing. |
 The Black Sword |
R1 (100%) R5 (107%) |
R1 (100%) R5 (106%) |
R1 (100%) R5 (107.8%) |
The premier 4 star weapon for Keqing. Although The Black Sword is slightly weaker than Lion’s Roar with its passive up, this weapon makes building Keqing more forgiving due to the CRIT Rate secondary stat and the lack of a condition on its passive. |
Lion’s Roar (75% Uptime) |
R1 (99%) R5 (106%) |
R1 (98%) R5 (105%) |
R1 (96.8%) R5 (103%) |
Facing enemies with innate Elements or running teams that can remove Electro from the enemy can harm this weapon’s uptime and damage. |
Kagotsurube Isshin |
R1 (98.5%) |
R1 (99%) |
R1 (94%) |
Very strong 4 star option that really appreciates DMG% buffs, slightly pulling ahead of The Black Sword if you’re running 2 TF 2 ATK% artifacts. |
 Blackcliff Longsword (1 Stack) |
R1 (96%) R5 (100%) |
R1 (97%) R5 (102%) |
R1 (94%) R5 (98%) |
The Blackcliff Weapon series is the king of inconsistency. On paper, this is Keqing’s best 4 star option at 3 stacks. However, it is difficult to recommend due to the passive being completely useless vs bosses and inconsistent overall. Not recommended to buy off the Starglitter shop. |
 Harbinger of Dawn R5 |
Passive On (94%) |
Passive On (95%) |
Passive On (96.8%) |
On par with Blackcliff Longsword (1 Stack) as long as its passive is on. Difficult to maintain without reliable shielding or healing. |
 The Alley Flash (Passive On) |
R1 (92%) R5 (99%) |
R1 (92%) R5 (98%) |
R1 (90%) R5 (97%) |
Although this weapon provides the highest Base Attack out of any 4 star sword, the Elemental Mastery secondary stat holds it back. Can be strong with the passive effect being active but drops to being the lowest weapon on this table without it. |
 The Flute |
R1 (92%) R5 (94%) |
R1 (92%) R5 (94%) |
R1 (89%) R5 (91%) |
Not much to say about this weapon as it is a simple stat stick. The passive proc is Physical Damage so it doesn’t do much for Electro Keqing. |
 Skyward Blade |
R1 (90%) R5 (97%) |
R1 (91%) R5 (97%) |
R1 (89%) R5 (95%) |
Does not offer enough stats to Keqing for it to be considered an option. She has no Energy problems and does not benefit off the Energy Recharge this weapon offers. |
 Amenoma Kageuchi |
88% | 90% | 86% | Loads of ATK% and nothing else. If you are running DMG% buffs like Kazuha or 2 TF, this weapon gets stronger but nothing to write home about. |
 Prototype Rancour |
R1 (86%) R5 (91%) |
R1 (87%) R5 (93%) |
R1 (84%) R5 (88%) |
Underwhelming for Electro Keqing. Not recommended to craft especially since Amenoma Kageuchi exists. |
Artifacts
Note: Any mentions of 2-Piece Shimenawa’s or 2-Piece Gladiator’s can be replaced with any artifact set that gives 18% ATK (there are too many to mention them all by name).
| Artifact Set Name | Notes |
2-Piece TF + 2-Piece Atk% |
2-Piece Thundering Fury combined with 2-Piece Atk% is one of sustained Electro Keqing’s most consistent sets. |
2-Piece Atk% + 2-Piece Atk% |
Marginally better than 2-piece TF 2-piece ATK% for Mistsplitter users, as well as potentially being competitive with 2-piece TF 2-piece ATK% depending on substats. |
Thundersoother |
This set outputs high damage on paper, but practically speaking it’s not a versatile set as it is entirely dependent on the enemies having Electro Aura. Not recommended to use. |
Shimenawa’s Reminiscence |
Can be used in Driver Keqing teams, where Keqing can skip Burst in rotations. |
Gladiator’s Finale |
The 4-Piece set bonus only buffs Keqing’s Normal Attacks and not her Charged Attacks, which makes the set lackluster. |
5.3 Physical Keqing
5.3.1. Physical Keqing Pro(s) and Con(s)
Pro(s) |
Con(s) |
|
Easy to build considering everyone gets a free Prototype Rancour at Adventure Rank 10. |
Loses out to Electro Keqing in damage due to Resistance Shred buffing Electro Keqing’s entire damage while SC only buffs Phys Keqing’s Normal Attacks. |
|
Ease of proccing Superconduct due to Keqing being Electro herself. |
Misses out on “free damage” from Elemental Reactions such as Electro-Charged and Aggravate. |
|
Rotations are easier than Electro Keqing. |
Extremely Stamina-heavy playstyle. |
|
Access to Freeze comps. |
Physical Damage does not scale well later into the game. |
|
|
Physical is very limited as a damage type. |
5.3.2. Pre AR-45
Spending Resin
Farming artifacts before you reach Adventure Rank 45 is not recommended because once you hit AR 45, every artifact domain run guarantees you at least one 5-Star artifact. It is also for this reason that we recommend saving your Fragile Resin until AR 45. What you should do instead is spend your Resin on farming Talent books, weapon ascension materials, character ascension materials, and leylines whenever you need them. Try to always be prepared for new World Levels and Character + Weapons ascension breakpoints.
Artifacts
Your Flower and Feather will always be Flat HP and flat ATK respectively. For your Sands and Circlet, you should prioritize getting ATK% mainstats. Goblets can be ATK% until you find a Physical DMG% one. Don’t break these mainstats for the sake of set bonuses; it is not worth it. Once you secure your mainstats, the best set bonuses to look for are Martial Artist, Resolution of Sojourner, Brave Heart, or Berserker.
Weapons
The Prototype Rancour is one of Keqing’s best 4-Star options for Sustained Physical. The weapon is given out as a reward for reaching Adventure Rank 10, which is extremely convenient. Stick with this weapon until you pull an Aquila Favonia.
Weapons
These are sorted by order of strongest to weakest out of the list. Weapons that are not mentioned are not strong enough to be worth considering.
| Weapon | Relative to Prototype Rancour | Notes |
| Aquila Favonia | R1 (125%) R5 (143%) |
Physical Keqing appreciates the Physical DMG secondary stat as well as the high amount of Attack this weapon offers. |
| Jade Cutter | R1 (124.5%) R5 (141%) |
Jade Cutter offers a ridiculous amount of Crit Rate as a secondary stat. Overall a consistent weapon and comfortably wins out over Aquila provided you are using Sara or Bennett. |
| Summit Shaper (Shielded) | R1 (120%) R5 (133%) |
While Summit Shaper usually needs time to ramp up, Keqing’s Elemental Burst fully stacks this weapon by itself. This, paired with consistent shield uptime, makes Summit Shaper one of Keqing’s top weapons. |
| Haran Geppaku Futsu | R1 (115%) R5 (121%) |
Packed with high CRIT Rate, this sword can be a strong option if you are lacking all of the 5 stars above it. The bonus to Keqing’s Normal Attacks is also appreciated but not enough to push this weapon further. |
| Summit Shaper (No Shield) | R1 (113%) R5 (120%) |
Unfortunately, the weapon does lose a bit of value without shield uptime yet remains a top option for Keqing. |
| Mistsplitter Reforged | R1 (112.5%) R5 (118.5%) |
Despite missing out on all the Elemental DMG% buffs this weapon offers, the high Base Attack as well as CRIT Damage secondary stat push it above the 4 star options. Keqing’s Burst also gets a little boost from the passive since we want to use it for the CRIT Rate anyways. |
| The Black Sword | R1 (103%) R5 (110%) |
It’s hard to recommend buying the Battle Pass for this weapon if your preferred playstyle is Physical Keqing, especially since it is not much stronger than Prototype Rancour, which is an F2P option that you can somewhat easily refine. |
Prototype Rancour |
R1 (100%) R5 (105%) |
The recommended 4 star weapon to use for Physical Keqing. The high Base Attack combined with a Physical DMG second stat puts this weapon at a comfortable top position amongst the 4 star options. |
| The Flute | R1 (97%) R5 (100.3%) |
A stat stick that is carried by the fact that the passive deals Physical DMG. Nothing too special about this weapon. |
| Blackcliff Longsword 1 Stack | R1 (100.3%) R5 (105.3%) |
The Blackcliff Weapon series is the king of inconsistency. On paper, this is Keqing’s best 4 star option at 3 stacks. However, it is difficult to recommend due to the passive being completely useless vs bosses and inconsistent overall. Not recommended to buy off the Starglitter shop. |
Artifacts
Note: Any mentions of 2-Piece Shimenawa’s or 2-Piece Gladiator’s can be replaced with any artifact set that gives 18% ATK (there are too many to mention them all by name).
| Artifact Set Name | Notes |
| Pale Flame | Keqing’s most consistent set for this playstyle. Stellar Restoration’s initial cast damage and the Thunderclap Slash damage count as two separate stacks so Keqing can almost maintain full uptime on the 4-Piece set bonus. |
| 2 PF 2 BSC | Can be stronger than 4-Piece Pale Flame but it depends on where you get better substats from. Remember the difference between running this combination and 4-Piece Pale Flame is 18% ATK and nothing else. |
| 2 PF / 2 BSC + 2 Shim / 2 Glad |
2-Piece Pale Flame / Bloodstained Chivalry + 2-Piece Gladiator’s Finale / Shimenawa’s Reminiscence can be situationally viable – it just depends on your substats. Use the optimizer if you can, otherwise avoid this combination. |
 Blizzard Strayer |
Only playable in Freeze Keqing teams. |
| Gladiator’s Finale | Does not buff Keqing’s Charged Attacks. Not recommended. |
| Shimenawa’s Reminiscence | Can be used as an alternative to 4-piece Pale Flame |
5.4 Quickswap Keqing
5.4.1. Pros and Cons of Quickswap Keqing. Table below.
| Pros | Cons |
|
Rotations are easier to execute. |
Quickswap teams are expensive to get going. |
|
Provides safety due to i-frame spam. |
Requires awareness of cooldowns. |
|
Beneficial for your account in the long-term because you’re building different characters. |
Limits Keqing’s personal strength |
|
Quickswap as a playstyle only functions around certain units. |
Weapons
These are sorted by order from strongest to weakest.
20 Substats distributed optimally. Solo Keqing without team buffs and if no refinement is mentioned the weapon is R1. Weapons that are not mentioned are not strong enough to be worth considering.
| Weapon | Relative to R5 Harbinger of Dawn | Notes |
| Mistsplitter Reforged | 3 Stacks (130%) 2 Stacks (116%) |
Keqing’s BiS for Quickswap. Her Burst doesn’t snapshot, allowing it to benefit from all 3 stacks. Note: For Quickswap players looking to utilize Mistsplitter, you should look to recast Stellar Restoration and then performing a Normal Attack before you Burst so you can get the 3 stacks. This only matters in Quickswap because all your damage is in your Burst and you’re not running extended rotations. |
| Jade Cutter | 124% | Very strong and consistent weapon that doesn’t require you to jump through hoops to get value out of it. |
| Summit Shaper | Shielded (123%) No Shield (115%) |
While it is convenient that Summit Shaper gets full stacks off of Keqing’s Burst alone, in Quickswap, her damage is in her burst itself. As a result, this weapon falls behind Mistsplitter and Jade Cutter. |
| Lion’s Roar | 100% Uptime (106%) 50% Uptime (100.5%) No Uptime (95%) |
Heavily dependent on enemies being inflicted with Electro, which can be difficult to maintain in Quickswap teams if Keqing is the sole Electro user. |
| Harbinger of Dawn R5 | 100% | Quickswap playstyle tends to focus on constantly switching party members and casting their abilities and the less time Keqing spends on-field the less the risk of dropping this weapon’s passive is. In content where maintaining the passive is difficult, like Corrosion, this weapon loses about 5% value if the uptime is 75% rather than 100%. Recommended to use for easy and consistent results. |
| The Black Sword | 99.5% | The only reason this weapon is close with Harbinger of Dawn is because I factored in two N1Cs in a Quickswap rotation. If you are only casting your Skill and Burst this weapon falls further behind. |
| Amenoma Kageuchi | 95% | There is nothing special to this weapon and crafting it is not worth when Harbinger of Dawn outperforms it by 5%. |
| The Flute | 95% | A stat stick that provides nothing but raw ATK%. |
| Blackcliff Longsword | 1 Stack (99.3%) 0 Stacks (94%) |
The Blackcliff weapon series faces the same issues regardless of your playstyle. Very inconsistent and expensive weapon and it is not recommended to buy off the Starglitter Shop. |
| The Alley Flash | With passive (93%) |
Even though this weapon carries a high Base Attack and has a passive that theoretically should perform well in a Quickswap environment, it is held too far back by the Elemental Mastery substat. |
| Skyward Blade | 91% | At least the weapon looks pretty. |
Artifacts
Note: Any mentions of 2-Piece Shimenawa’s or 2-Piece Gladiator’s can be replaced with any artifact set that gives 18% ATK (there is too many to mention them all by name).
| Artifact Set Name | Notes |
| 2-Piece SR + 2-Piece Gladiator’s |
A solid set combination that is very competitive with 2-Piece Thundering Fury + 2-Piece Noblesse Oblige. Recommended to farm for. |
 2 TF 2 NO |
You can use 2-Piece Thundering Fury with 2-Piece Noblesse Oblige if you already have existing pieces. Not recommended to farm for Thundering Fury and you should save your NO pieces for your supports. |
5.5 Gear Comparison Calculator
The Gear Comparison Calculator can help you compare the damage of two different set of Artifacts / Weapons, and can help you figure out if you should use EM or ATK Sands given your stats
CLICK HERE TO TOPUP GENESIS CRYSTALS (PROMO PRICE)
6. Team Composition and Character Synergies
Keqing is quite versatile when it comes to your options for team compositions. This section will try to cover some of her most popular comps as well as niche ones.
6.1 Electro Keqing
6.1.1. Agravate Keqing
With the addition of Dendro, Aggravate Keqing teams have been seeing a lot of popularity, and for good reason. Aggravate in itself does high damage, and paired with Keqing’s Electro application rate and AoE, Aggravate teams have shown to be powerful both in single-target and AoE scenarios, albeit less in single-target.
- Team description: The standard skeleton for an Aggravate Keqing team. You need a Dendro character to apply Aggravate, an Anemo (or Zhongli) character for Resistance Shred and team utility, and an Electro off-field DPS that can proc Aggravate alongside Keqing. You should have no problems maintaining Aggravate uptime with this team archetype.
- Flex Option
- Dendro Flex
-
Collei can perfectly sustain your Aggravate rotations, as well as provide a team-wide EM buff. She can fit into shorter rotations compared to Dendro MC, and doesn’t require as much Energy Recharge considering you can Burst on her every other rotation. She is also really cute.
-
Dendro MC is another Dendro option that offers plenty of Dendro application, as well as a team-wide EM buff. However, Dendro MC struggles with Energy problems, forcing you to throw as much Energy Recharge as possible on them, as well as a Favonius Weapon. Dendro MC rotations are also longer than Collei’s rotations. However, they are generally more flexible as short rotations tend to be strict.
-
Tighnari and Keqing both desire field time, which complicates things. If you attempt to reduce Tighnari’s field time by using him as a Burst / Skill bot and neglecting his Charged Attacks, there is little reason not to just run Collei or DMC—both of whom can do the job of applying Dendro but can additionally provide off-field damage and minor buffs. That being said, Tighnari is still a valid option for your Dendro Flex slot, just a suboptimal one compared to Collei or Dendro MC.
-
- Electro Flex
-
Fischl and Keqing have a powerful synergy in Aggravate teams thanks to Keqing’s Electro application rate enabling Fischl A4’s to proc consistently. One of the best off-field DPS options.
-
Kuki can slot in as your healer while also dealing AoE off-field damage with Aggravate, providing high value to your team.
-
Beidou offers high off-field damage in AoE scenarios and some defensive utility if you opt into using Kazuha. However, without Fischl, Beidou can run into Energy problems. 4TF Keqing can help mitigate Beidou’s Energy problems, but not by much.
-
- Anemo Flex
-
Kazuha’s off-field damage is further amplified in Aggravate teams by proccing Aggravate with Electro Swirls. Not to mention his buffing capability to your Keqing and your other Electro unit with DMG%. As usual, Kazuha is the go-to unit for maximizing your team’s damage.
-
Sucrose provides Thrilling Tales of Dragon Slayers (TTDS) to your party, as well as grouping and off-field Swirls. Additionally, her C6 can easily provide Electro DMG to your Keqing and other Electro character.
-
Sayu can serve as a healer while also dealing damage with off-field Swirls proccing Aggravate.
-
Jean can fill the roles of 4 VV and healer. However, the lack of off-field Electro Swirls can lower her value in Aggravate teams.
-
Zhongli offers defensive utility, as well as buffs up your team’s damage through Resistance Shred and 4-Piece Archaic Petra. Archaic Petra shouldn’t be difficult to maintain due to high uptime on Electro, making it easy to get crystallized Electro shields. You can try snipe Archaic Petra pieces through strongbox now.
-
- Rotation
- Note: Keqing is using 4 TF in all of the rotations below. Although in the majority of rotations I’m detonating Keqing’s Stiletto with a Charged Attack, you can Recast the Skill instead if you would like more infusion time or you enjoy teleporting around. 4 TF is generally very flexible in how you can use it
- Collei Rotation
- Kazuha Fischl
-
Fischl Skill > Kazuha Skill > Kazuha Burst > Collei Skill > Collei Burst > Keqing Skill > Keqing Burst > Keqing Skill Recast > Keqing N1C N1 > Keqing Skill > Keqing N1C 3x > Loop
-
Fischl will be weaker first rotation because she will miss Kazuha buffs. You can recast Oz between Collei Burst and Keqing Skill if you’d like.
-
- Zhongli Fischl
-
Zhongli Hold Skill > Collei Skill > Collei Burst > Fischl Skill > Keqing Skill > Keqing Burst > Keqing Skill Recast > Keqing N1C N1 > Keqing Skill > Keqing N1C 3x > Loop
-
If you are running Archaic Petra on Zhongli, you can start the rotation with Fischl CA then pick up the Crystallized Shield.
-
- Kazuha Kuki
-
Kuki Skill > Collei Burst > Kuki Burst > Kazuha Skill > Kazuha Burst > Collei Skill > Keqing Skill > Keqing Burst > Keqing Skill Recast > Keqing N1C N1 > Keqing Skill > Keqing N1C 3x > Loop
-
- Kazuha Fischl
- Dendro MC Rotations
- Kazuha Fischl
-
Fischl Burst > Dendro MC Skill > Kazuha Skill > Kazuha Burst > Dendro MC Burst > Keqing Skill > Keqing Burst > Keqing Skill Recast > Keqing N1C N1 > Keqing Skill > Keqing N1C 2x > Fischl Skill > Kazuha Skill > Dendro MC Skill > Keqing Skill > Keqing Skill Recast > Keqing N1 > Keqing Burst > Keqing N1C > Keqing Skill > Keqing Skill Recast > Keqing N1C > loop ... this is a lotttttt!!!!!!!!!
-
As mentioned earlier, Dendro MC rotations are more flexible than Collei’s and you don’t have to stick to the rotation above. It is by no means the only way to play this team.
-
- Zhongli Fischl
-
Zhongli Hold Skill > Fischl Burst > Dendro MC Skill > Dendro MC Burst > Keqing Skill > Keqing Burst > Keqing Skill Recast > Keqing N1C N1 > Keqing Skill > Keqing N1C 3x > Zhongli Hold Skill > Dendro MC Skill > Fischl Skill > Keqing Skill > Keqing Burst > Keqing Skill Recast > Keqing N1C N1 > Keqing Skill > Keqing N1C 3x > Loop
-
If you are running Archaic Petra on Zhongli, you can start the rotation with Fischl CA then pick up the Crystallized Shield.
-
- Kazuha Kuki
-
Kuki Skill > Kuki Burst > Dendro MC Skill > Dendro MC Burst > Kazuha Skill > Kazuha Burst > Keqing Skill > Keqing Burst > Keqing Skill Recast > Keqing N1C 2x > Dendro MC Skill > Kazuha Skill > Keqing Skill > Keqing Skill Recast > Keqing N1C 3x > Loop
-
Kuki will need a lot of Energy Recharge (~180%) to consistently Burst.
-
- Kazuha Fischl
- Dendro Flex
6.1.2. Driver Keqing
One of the strongest and most popular Keqing teams. The core of a standard Keqing comp is off-field Hydro application from units like Xingqiu or Kokomi alongside Fischl or Beidou and an Anemo slot that’s preferably Kazuha. Please see “Flex Options” for more details.
Important note about rotations: You should look to weave in a Normal Attack on your supports before swapping off them so you don’t waste Beidou or Xingqiu Burst procs. Furthermore, bursting on Keqing with both Xingqiu and Beidou / Yelan on your team IS A DPS LOSS.
Xingqiu Variant
This composition utilizes the stagger from Electro-Charged as well as the raw damage from units like Xingqiu and Fischl. Your Anemo unit should ideally be Kazuha.
You may think that this comp is unplayable due to the lack of a healer but thanks to Xingqiu’s Skill providing some Damage Reduction, some healing, and the amount of stagger Electro-Charged provides, not having a healer is nowhere near as bad as it sounds.
- Flex Option
- Electro Flex
-
Note: You can run both Fischl and Beidou as your 3rd and 4th unit instead of having an Anemo as your last slot. The comp remains one of the best Keqing comps you can play.
-
Fischl offers high off-field damage as well as consistent Electro application and strong Energy generation making her one of the most popular picks for this slot.
-
Beidou is another Electro character that offers strong off-field damage and Electro application as well as extremely potent AoE damage, covering Fischl and Xingqiu’s “weakness”. Her Damage Reduction is also an added bonus that further lowers your need of a healer.
-
Kuki Shinobu can fill the healer slot for you if you are finding it difficult to play an Electro-Charged team without a healer. However, keep in mind that your team damage will drop HEAVILY if you are slotting Kuki in Fischl or Beidou’s place.
-
 Yelan is best paired with Xingqiu due to their powerful synergy that comes from being able to battery each other, reducing ER requirements, and the Hydro shred from Xingqiu’s C2.
-
- Anemo Flex
-
Kazuha is the golden boy of almost every Keqing team. He can provide extremely high utility and damage buffs to this composition by swirling both Hydro and Electro, buffing the Elemental Damage of your entire team as well as shredding the enemy’s Elemental Resistance. Use Kazuha whenever you can.
-
Sucrose can act as a budget Kazuha, providing strong Crowd Control and TTDS buff. She also applies large amounts of Anemo making it highly likely that you will Swirl both Hydro and Electro, increasing the damage of your entire party.
-
Not only is Jean gorgeous but she also provides healing if you find yourself struggling without a healer and she packs a punch with her Elemental Skill.
-
Wait is Bennett Anemo now? No but he can perfectly substitute any of the above Anemo choices mentioned and is especially strong with Beidou and Fischl due to their snapshot properties.
-
Sayu can fill a healer slot while offering off-field damage thanks to her swirls. Just try not to fall asleep while using her.
-
- Electro Flex
- Rotation
-
The idea is more or less the same throughout the different variants you could run. For Sucrose, try to Normal Attack on her before you cast your Elemental Burst in hopes of absorbing Hydro unless she is C6, in which case you should look to absorb Electro.
You should look to weave in a Normal Attack on your supports before swapping off them so you don’t waste Beidou or Xingqiu Burst procs.
- Kazuha Setup
- Jean Setup
- Sucrose setup
- Sayu Setup
- Fischl Beidou setup
-
Fischl Kokomi Variant
Although this composition needs at least two five star units, Kokomi can function on a budget build with TTDS and you are freeing your Xingqiu for your other team if you are doing abyss. Kokomi also brings healing and off-field Hydro albeit her Hydro application is not as good as Xingqiu’s.
- Flex Option
-
Beidou can slot in as a fourth unit and add just as much value to your team as the Xingqiu variant. Ideally you should try to snapshot TTDS on Beidou by swapping into her after Kokomi and casting your Burst THEN swapping into Keqing.
-
As stated Kazuha is the golden boy of almost every Keqing team. In this specific variant you don’t need to worry about Swirling Hydro because Kokomi doesn’t utilize the shred so your rotations are a little easier. Use Kazuha whenever you can.
-
Sucrose grouping is quite strong for Kokomi because her Jellyfish only covers a certain area and staying within its range is important for the team to function. Avoid running TTDS on both Sucrose and Kokomi.
-
- Rotation
-
Fischl Skill > Swirl Electro > Kokomi Skill > Keqing Skill into Burst.
-
If you are playing Beidou you should look to weave in a Normal Attack on your supports before swapping off them so you don’t waste her Burst’s procs.
-
Mono Electro (Pure Electro)
Mono Electro teams utilize the high amount of Electro Particles being generated as well as full uptime on Lion’s Roar and / or Thundersoother provided the enemy does not have an innate element. These teams usually consist of 3 Electro characters as well as an Anemo slot that’s flexible between a few characters.
Important note about rotations: Look to weave in a Normal Attack on your supports before swapping out of them so as to avoid wasting Beidou Burst procs.
Beidou – Fischl / Sara Variant
This composition can either take advantage of Sara’s Attack buff to snapshot it onto Beidou and let Keqing take the steering wheel, or play an Energy economy game with Fischl for easier and more consistent rotations.
- Flex Option
- Electro Flex
-
Sara’s rotations are clunkier and more complicated than Fischl’s. However, Beidou can snapshot Sara’s ATK buff onto her Burst and get funneled directly from Sara which can lower Beidou’s ER requirements provided you funnel Particles properly.
-
Oz generates Particles passively and does not require you to actively funnel into Beidou. Additionally, you don’t have to juggle any ATK buffs with this variant, making it easier to execute.
-
Kuki Shinobu can fill the healer slot for you if you are lacking any of the defensive options in the Anemo Flex slot. Use Favonius Sword on Kuki to alleviate Beidou’s Energy problems.
-
- Anemo Flex
-
Kazuha is capable of shredding Electro and providing Elemental Damage% bonus to your party making everyone benefit from his utility. Recommended to slot as the fourth member.
-
Although Jean can’t buff your party’s Elemental Damage% like Kazuha, she provides healing and safety. Your best choice if you are in need of a healer.
-
Zhongli can fill two roles at the same time with his shield providing protection and buffing your team’s damage all at once, making him offer a good middle ground between protection and party buffing.
-
While Sucrose loses value from her Elemental Mastery sharing in a Mono team, her Crowd Control is still powerful and she can provide TTDS to your party.
-
Bennett really isn’t Anemo?! While that is true, he can still perfectly substitute any of the above Anemo choices mentioned and is still especially strong with Beidou Fischl due to their snapshot properties.
-
Sayu is only recommended if you are struggling without a healer and Jean is not available to you.
-
- Rotation
- Sara Beidou
- The ideal rotation would be Sara Skill CA > Beidou Skill Burst > Swirl Electro > Sara Burst > Keqing Skill Burst > Repeat. Unfortunately there isn’t enough Energy to go around so Sara will miss her Burst every other rotation meaning you will miss buffing Beidou or Keqing.
Beidou is running 135% ER while Sara is running 200%. The less perfect counters you get on Beidou the more Energy you need for her.
- The ideal rotation would be Sara Skill CA > Beidou Skill Burst > Swirl Electro > Sara Burst > Keqing Skill Burst > Repeat. Unfortunately there isn’t enough Energy to go around so Sara will miss her Burst every other rotation meaning you will miss buffing Beidou or Keqing.
- Fischl Beidou
-
The ideal rotation here is to Fischl Skill > Swirl Electro > Beidou Skill > Beidou Burst > Keqing Skill > Keqing Burst > Repeat. Cast Fischl Burst whenever her Skill is on cooldown.
-
Beidou is on 140% ER here. Perfect counters are important to maintain Burst uptime on Beidou.
-
- Sara Beidou
- Electro Flex
Bennett Anemo
A composition with high potential thanks to Bennett’s Attack buff as well as the ability to shred Electro Resistance. Look to snapshotting Bennett’s buff onto Fischl while swirling Electro to gain the most out of this team.
- Flex Option
-
Yet another team comp that loves having Kazuha as the Anemo slot due to the amount of buffing he can offer to your team.
-
A solid second option for Anemo providing grouping so the enemies stay inside Bennett field as well as TTDS.
-
- Rotation
- You should look to start your rotation with Bennett Skill Burst > Fischl Skill > wait for Oz to apply Electro then Swirl (if you have Fischl C6 you can Normal attack instead of waiting) > Keqing Gaming.
CLICK HERE TO TOPUP GENESIS CRYSTALS (PROMO PRICE)
6.2 Quickswap Electro
Keqing can fit into so many Quickswap teams and we will give a few sample compositions and you can try different teams and see what you like most.
Really though you can play Quickswap Keqing in a wide variety of teams because she doesn’t have high synergy with anyone except Kazuha but can take anyone. Here is a list of the characters you can make your own squad:
| Bennett | Massive party-wide Attack buff that is useful for your entire party as you’ll be swapping through everyone in a Quickswap environment. |
| Fischl | You can drop Oz and let him do work without having to worry about much. You should look to alternate between Fischl’s Skill and Burst to maximize Oz uptime. |
| Jean | Jean can bring a lot to the table being a Healer with a short cooldown Skill and access to 4-Piece Viridescent Venerer. You don’t need to cast her Burst every rotation allowing room for desync. |
| Kazuha | Another unit with access to Viridescent Venerer and a short cooldown Skill. Offers Elemental Damage bonus alongside grouping. |
| Sara | Strong Burst damage with buffing capabilities. C2 makes rotations smoother but she’s still playable without it. |
| Mona | Low uptime buff is more suited for Quickswap playstyles. |
| Venti | Similar to Kazuha, he has access to Viridescent Venerer and offers the best grouping you can ask for. |
6.3 Physical Keqing
Physical Keqing doesn’t need too much to function other than Cryo application every 10-12 seconds which is pretty much every Cryo character in the game. See “Flex Options” for more details.
Standard Physical
-
“Whatever you want” Variant
- Team description:
- A fairly standard Physical comp that takes advantage of how easily Keqing can proc Superconduct, boosting her damage. You have a lot of flex options here so browse the “Flex Options” market and pick whatever you want.
- Flex options
- Cryo Flex
-
Rosaria is one of the best off field Cryo appliers in the game. Not only is she good at applying Cryo, she also offers a Crit Rate buff and her C6 shreds Physical Resistance.
-
Male Rosaria (or maybe Rosaria is female Kaeya?). Has worse application than Rosaria especially if she is C2 but offers a QoL Stamina buff. Ultimately it doesn’t matter too much and you should pick based on your personal preference.
-
Diona and Qiqi are your two healer options for your Cryo slot. Diona is recommended because she can ease on your Stamina and generate more Energy.
-
- Two Other Slots
-
Fischl offers high single-target damage from off-field and is especially valuable when paired with Beidou if you decide to run the Keqing / Beidou / Fischl trio.
-
Physical Keqing can drive Beidou just like Electro Keqing can. Try to pair Beidou with Fischl for an easier time managing Beidou’s Burst.
-
While Xingqiu is an amazing off-field DPS, he is better utilized in Freeze Physical Keqing which will be discussed in the next variant.
-
Barbara can serve as your healer while providing TTDS buff to Keqing and raise your team’s morale.
-
Fills the same slot that Barbara does but instead of providing morale support, she brings battle tactics with her.
-
Zhongli is Zhongli. He can substitute for a healer (as long as you aren’t under the effect of Corrosion) and provide Physical RES Shred at the same time. A solid and consistent option.
-
- Rotation
- Fischl Skill > Rosaria Skill into Burst > Diona hold Skill into Burst > Keqing Skill into Burst into N1C spam. Rosaria and Diona are both on a Favonius weapon.
- Cryo Flex
Freeze Physical
Xingqiu – Double Cryo Variant
The name of the game is Freeze. You can run Xingqiu with 2 Cryo Characters and keep your opponents Frozen, providing comfort in the enemies not flying away after every CA. 4 BS is weaker than 4 PF in Freeze but if you have a Blizzard Strayer set lying around somewhere you can use it rather than farming for a new set.
- Flex Options
-
A strong battery and very consistent Cryo application making Kaeya top tier for Freeze teams. Recommended to pair with Rosaria.
-
Similar to Kaeya, Rosaria is very strong in Freeze teams especially since her weakness of “limited range burst” is irrelevant in a Freeze comp where your enemy can’t move. Recommended to pair with Kaeya.
-
If you find yourself needing a healer in this comp then Diona is your best option despite her Cryo application being nowhere near as good as Kaeya or Rosaria.
-
Extremly weak Cryo application and Energy generation. Not recommended to use unless you don’t have access to Diona and need a healer.
-
Does Ganyu “work” in a Keqing Freeze comp? Well, her Burst does work well enough as a Cryo applier for Freeze but it’s not the best utilization of Ganyu by any means.
-
- Rotation
- Xingqiu Skill into Burst > Rosaria Skill into Burst > Kaeya Skill into Burst > Keqing Skill into N1C Spam. You do not need to Burst on Freeze Keqing if you are using Blizzard Strayer because you are getting plenty of Crit Rate from Blizzard Strayer and Cryo Resonance.
---The End---
Thank you for reading
